This post may contain affiliate links. Should you make a purchase through one of these links, I may earn a small commission that supports me to keep making new content at no additional cost to you. For more info, please visit the Privacy Policy page.
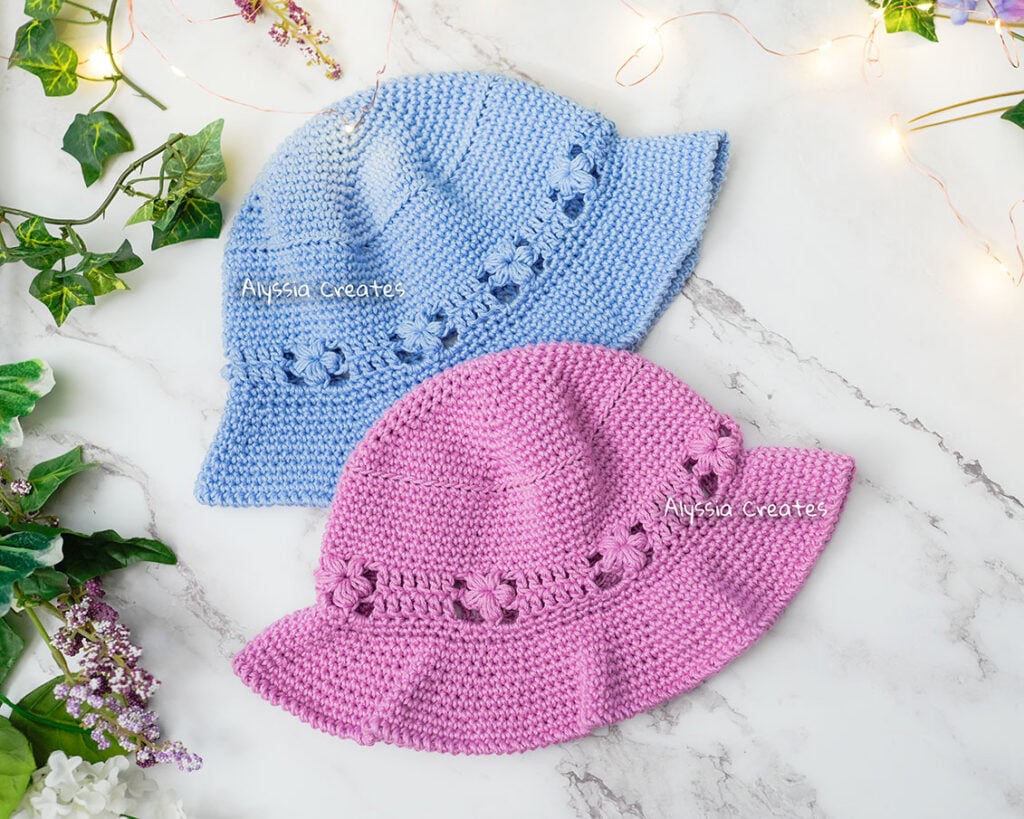
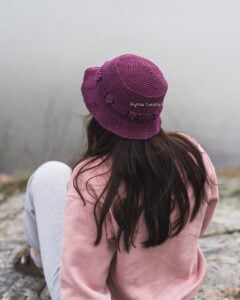
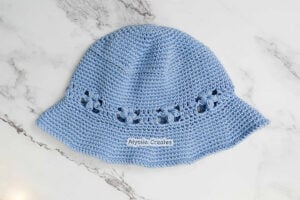
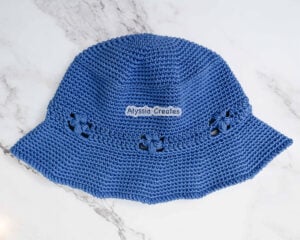
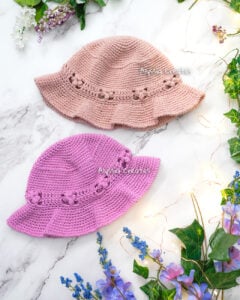
Lets learn how to make an easy crochet bucket hat that has a cute puff flower accent above the brim! This bucket hat is the perfect project to start your summer with 4 sizes (toddler, child, teen and adult) as well as including 2 brim options; a flatter/more structured brim or a wavy brim that has more dimension! This pattern includes very detailed instructions and has an accompanying video tutorial if more clarity is needed 🙂 If you haven’t crocheted before, start with my beginner series to learn how to crochet!


Please note: This pattern is copyright of Alyssia Stacey-Orchard of Alyssia Creates. DO NOT claim this design as your own or make patterns/video tutorials based on or inspired by this design.
What Yarn Am I Using?
I am using Lion Brand 24/7 Cotton Yarn. It is my absolute favourite go to yarn for creating just about anything! I HIGHLY recommend using a cotton yarn to create this bucket hat to ensure your hat remains breathable through the summer heat. Some other cotton yarns I recommend are the Paintbox Yarns Cotton Aran (alternative cotton yarn with more colour options available!) and the Hobbii Friends Cotton 8/8 (another alternative cotton yarn with lots of colour options).

You can purchase the ad-free printable PDF version for this Bucket Hat pattern here!
Pair this bucket hat to wear with my Forget Me Not Bum Bag or my Strawberry Drawstring Bag Patterns!
Difficulty Level
- Advanced Beginner/Intermediate
Supply List
Yarn/Material – Lion Brand 24/7 Cotton Yarn (worsted weight level 4 yarn):
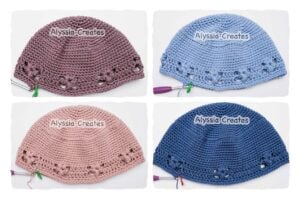
- X-Small – Approx. 77g – 88g/146.3 yds – 167.2 yds (Vintage Lilac)
- Small – Approx. 94g – 100g/178.6 yds – 190yds (Sky)
- Medium – Approx. 104g – 110g/197.6 yds – 209 yds (Beechnut)
- Large – Approx. 124g – 131g/235.6 yds – 248.9 yds (Denim)
Hook:
Other:
Stitches Used/Abbreviations (US Terms)
- Magic Circle
- ch = Chain
- st(s) = Stitch(es)
- sl st = Slip Stitch
- sc = Single Crochet
- dc = Double Crochet
- inc = 2 sc in same stitch
- ps = Puff Stitch
- ps3tog = Puff Stitch 3 Together
- yo = Yarn Over
- FO = Fasten Off
- bl(o) = Back Loop (Only)
- fl(o) = Front Loop (Only)
- sk = Skip
- sp(s) = Space(s)
- Rep = Repeat
- Cont = Continue
- Beg = Beginning
- Prev = Previous
- * = Repeat Instructions
- […] = Repeat instructions within brackets the indicated amount of times
Gauge
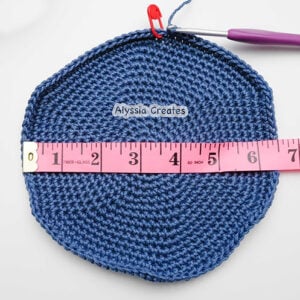
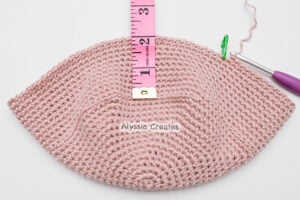
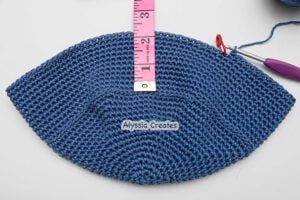
Circle measures to approx. 4” across at round 10
Pattern Notes
- The yarn used is on the thinner side of being worsted weight so keep that in mind if you choose to use a different yarn.
- This pattern is written in US terms and is worked in continuous rounds.
- There are 4 sizes available (see size chart below)
- The pattern is broken down into 3 sections to separate the different components that make up the hat; crown, body and brim.
- Photo steps/breakdowns are included. Photographs are from a right handed crochet perspective.
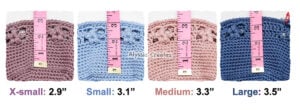
Size Chart
|
Size |
Head |
Crown Diameter |
Body Length |
Brim Length |
|---|---|---|---|---|
|
X-Small (Toddler) |
18” – 19” |
5.4” |
2.9” |
1.6” – 2” |
|
Small (Child) |
19.5” – 20.5” |
5.75” |
3.1” |
2″ |
|
Medium (Teen/Small Adult) |
21” – 22” |
6.1” |
3.3” |
2″ |
|
Large (Large |
22.5” – 23.5” |
6.5” |
3.5″ |
2” – 2.4” |
Follow along with my YouTube tutorial!
Pattern
Section 1 – Crown
In this section, we will be making the top circle of the bucket hat, also known as the crown. This will be worked in continuous rounds meaning that there will be no seam and you will mark the beginning of each round with a stitch marker. Each round will increase by 6.
ALL SIZES – X-SMALL, SMALL, MEDIUM AND LARGE:
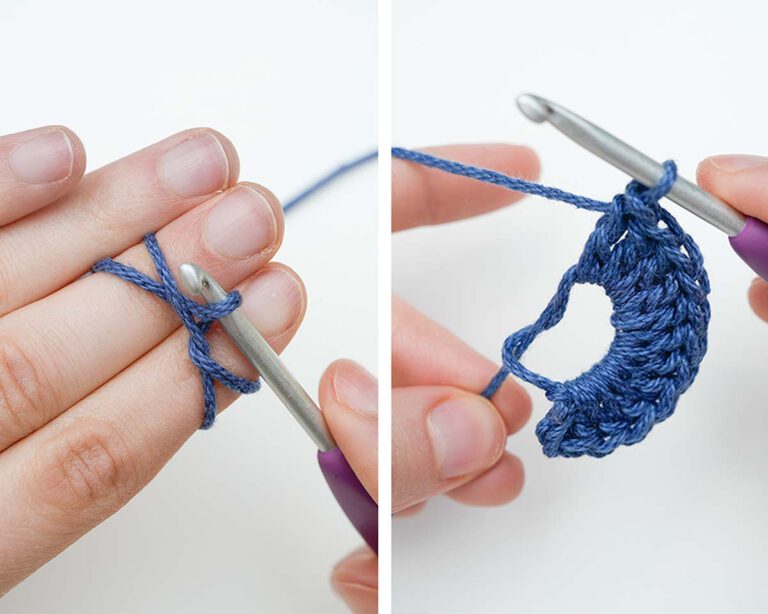
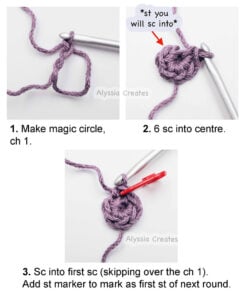
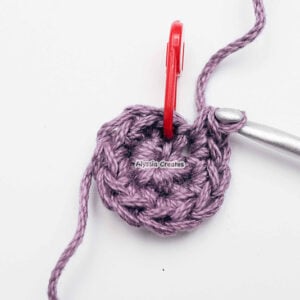
Round 1: Starting with a 4mm hook, make a magic circle. Ch 1 (doesn’t count as a st). Work 6 sc into the circle. Sc into first sc (skipping over the ch 1). Add st marker to mark as first st of next round.
Round 2: Work a 2nd sc into same st to inc. Inc in each st around. (12 sc)
Round 3: [inc, sc] 6 times (18)
Round 4: [inc, sc 2] 6 times (24)
Round 5: [inc, sc 3] 6 times (30)
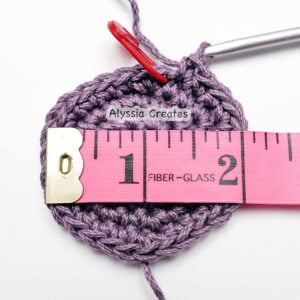
After completing round 5, your circle should measure to 2” across.
Round 6: [inc, sc 4] 6 times (36)
Round 7: [inc, sc 5] 6 times (42)
Round 8: [inc, sc 6] 6 times (48)
Round 9: [inc, sc 7] 6 times (54)
Round 10: [inc, sc 8] 6 times (60)
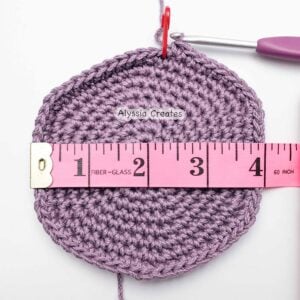
After completing round 10, your circle should measure to approx. 4” across (from the flatter sides of the circle). If your measurement is off, adjust your hook size to match gauge.
Round 11: [inc, sc 9] 6 times (66)
Round 12: [inc, sc 10] 6 times (72)
Round 13: [inc, sc 11] 6 times (78)
Round 14: [inc, sc 12] 6 times (84)
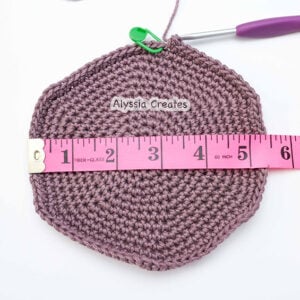
For the X-SMALL size, stop here after completing round 14 – diameter should be approx. 5.4” across. Continue for Small, Medium and Large.
Round 15: [inc, sc 13] 6 times (90)
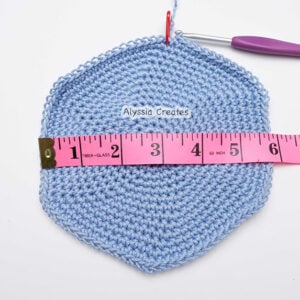
For the SMALL size, stop here after completing round 15 – diameter should be approx. 5.75” across. Continue for Medium and Large.
Round 16: [inc, sc 14] 6 times (96)
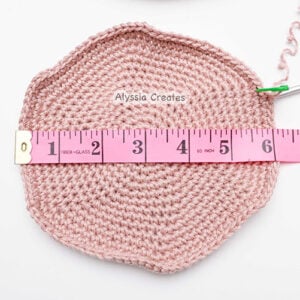
For the MEDIUM size, stop here after completing round 16 – diameter should be approx. 6.1” across. Continue for Large.
Round 17: [inc, sc 15] 6 times (102)
For the LARGE size, stop here after completing round 17 – diameter should be approx. 6.5” across.
Note: If you end up requiring a larger size, you can make more rounds for the crown by continuing to increase by 6 for each round (achieved by continuing to add 1 sc to the existing amount of sc that was in-between the increases of the last round).
Section 2 – Body
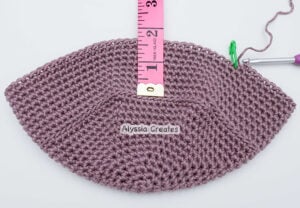
This section will create the body of the bucket hat (the space between the crown and the brim). There will be no increases for this section though each size will have a slightly different amount of rounds before creating the flower detail. Please note: you can take away or add more rounds than what is indicated for each size before adding the flower detail (depending on where you would like the hat to sit). After completing the amount of rounds for each size as the following indicates, the flower detail + 2 rounds afterwards before starting the brim will add about 1.3” to the specified measurements.
All Sizes – X-SMALL, SMALL, MEDIUM AND LARGE:
Round 1: Sc into the blo around to st marker. (84, 90, 96, 102)
Round 2 – 9: Working into both loops again, sc around (84, 90, 96, 102)
For the X-SMALL size, stop here after completing round 9. The body should currently measure to approx. 1.6” from the edge of the crown (flower detail + 2 rounds afterwards will add about 1.3” for 2.9” total for the body)
SMALL, MEDIUM AND LARGE ONLY:
Round 10: Sc around to st marker (90, 96, 102)
For the SMALL size, stop here after completing round 10. The body should currently measure to approx. 1.8” from the edge of the crown (flower detail + 2 rounds afterwards will add about 1.3” for 3.1” total for the body)
MEDIUM AND LARGE ONLY:
Round 11: Sc around to st marker (96, 102)
For the MEDIUM size, stop here after completing round 11. The body should currently measure to approx. 2” from the edge of the crown (flower detail + 2 rounds afterwards will add about 1.3” for 3.3” total for the body)
LARGE ONLY:
Round 12: Sc around to st marker (102)
For the LARGE size, the body should currently measure to approx. 2.2” from the edge of the crown (flower detail + 2 rounds afterwards will add about 1.3” for 3.5” total for the body”)
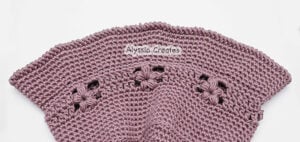
Adding the Flower detail
The next round will be worked in multiples to create the flower detail. Because of the differing stitch counts for each size, the amount of sts in-between each flower detail will differ in order to fit evenly into the respective stitch count. The flowers will be made by crocheting puff stitches together.
- The X-SMALL size will be worked in multiples of 12 to fit into the overall stitch count of 84; the flower worked over 6 stitches and then 6 dc in-between each flower.
- The SMALL will be worked in multiples of 10 sts to fit into the overall stitch count of 90; the flower worked over 6 stitches and then 4 dc in-between each flower.
- The MEDIUM size will be worked in multiples of 12 to fit into the overall stitch count of 96; the flower worked over 6 stitches and then 6 dc in-between each flower.
- The LARGE will be worked in multiples of 17 to fit into the overall stitch count of 102; the flower worked over 6 stitches and then 11 dc in-between each flower.
Notes:
- If you ended up modifying pattern for a smaller or larger size than the sizes included, find out the multiples that fit into your stitch count and then subtract 6 to find out how many dc you will need in-between each flower detail.
- For the next 3 rounds, the differing stitch counts in-between the flower details for each size will be specified within parentheses.
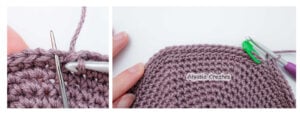
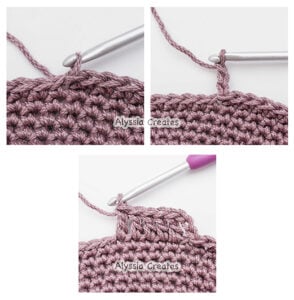
- The next 3 rounds will be broken down into bullet points with photograph steps below for further clarity – if more clarity is needed, check out my youtube tutorial!
Round 10 (11, 12, 13):
- Sl st into first st with st marker. Ch 3 (first dc), dc into next 5 sts (3 sts, 5 sts, 10 sts).
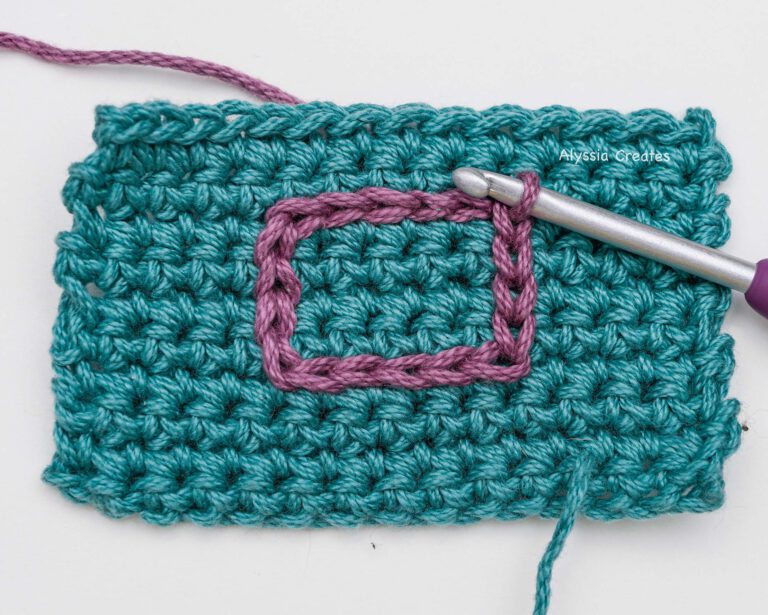
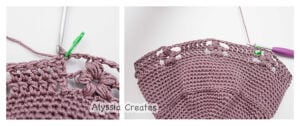
- * Ch 3, ps3tog starting first incomplete ps in 2nd ch from hook, then sk st after last dc made and work 2nd incomplete ps, sk 2 sts, work 3rd incomplete ps. Yo, pull through all loops to complete ps3tog.
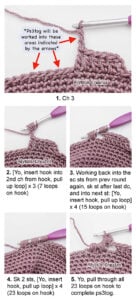
- Ch 1 tightly to close inner flower. Ch 1 more, ps into centre hole of the ps3tog. Ch 2, sk st after ps3tog, dc into next 6 sts (4 sts, 6 sts, 11 sts).
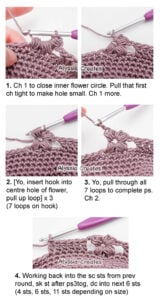
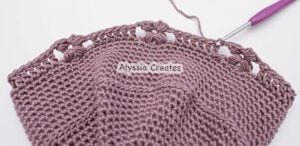
- Rep the previous 2 bullet point steps from the * until end of round. Round should end with a flower. Sl st to top ch of first st to join. (X-Small – 7 multiples of 12; Small – 9 multiples of 10; Medium – 8 multiples of 12; Large – 6 multiples of 17)
Round 11 (12, 13, 14):
- Ch 3 (first dc), dc into top of next 5 (3, 5, 10) dcs.
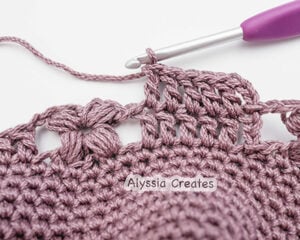
- *Ch 2, ps into centre of flower from prev round. Ch 3, dc into top of next 6 (4, 6, 11) dc of prev round.
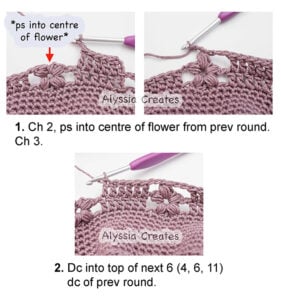
- Rep from * in previous bullet point until end of round. Round should end with a flower. Sc into 3rd ch of first st after last flower is complete. Add st marker into this sc. (X-Small – 7 multiples of 12; Small – 9 multiples of 10; Medium – 8 multiples of 12; Large – 6 multiples of 17)
Round 12 (13, 14, 15):
- Sc into next 5 (3, 5, 10) sts.
- * Work 3 sc into ch sp from prev round, sk over the ps, 3 sc into next ch sp. Sc into the next 6 (4, 6, 11) sts.
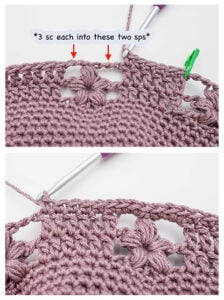
- Rep from * in previous bullet point step back to st marker. (84, 90, 96, 102 sc around)
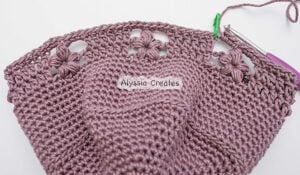
Round 13 (14, 15, 16): Sc around. (84, 90, 96, 102)
From the edge of the crown to where you currently left off, the body should measure approx.:
Note: you can adjust the amount of rounds before + after flower detail to your preference 🙂
Section 3 – Brim
This section will create the brim of your bucket hat. There are two options for the brim; one with more structure that sits more flat and one with more dimension and wave. You can make the brim as long or as short as you’d like.
Notes:
- To continue to make brim longer than what is written for each size, continue indicated sequence for adding the increase rounds (achieved by continuing to add 1 sc to the existing amount that was in-between the increases of the last increase round).
- Brim will soften a bit with use to be more flowy.
Option 1 – Flat Brim:
The first option is for the more flat/structured brim (skip ahead if you would like to make the wavy brim option). All sizes will be increasing by 12 stitches every other round but each size will have different sequences of increases and stitch counts throughout. If you would like your brim to grow outwards even more gradual so it has little to no dimension, you can modify pattern to have less increases (for example, you can add another regular round in-between the increase rounds)
X-SMALL ONLY
Round 1: Working into the flo around: [inc, sc 6] 12 times (96)

Round 2: Working in both loops again, sc around (96)
Round 3: [inc, sc 7] 12 times (108)
Round 4: Sc around (108)
Round 5: [inc, sc 8] 12 times (120)
Round 6: Sc around (120)
Round 7: [inc, sc 9] 12 times (132)
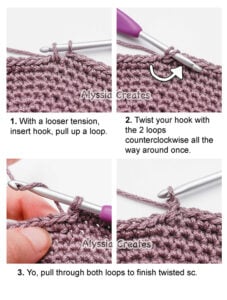
Round 8: Work twisted scs back to beg of round. Sl st into first twisted sc st to join. FO. If preferred, work the round as regular sc. (132)
SMALL ONLY
Round 1: Working into the flo around: [inc, sc 6, inc, sc 7] 6 times (102)
Round 2: Working in both loops again, sc around (102)
Round 3: [inc, sc 7, inc, sc 8] 6 times (114)
Round 4: Sc around (114)
Round 5: [inc, sc 8, inc, sc 9] 6 times (126)
Round 6: Sc around (126)
Round 7: [inc, sc 9, inc, sc 10] 6 times (138)
Round 8: Sc around (138)
Round 9: [inc, sc 10, inc, sc 11] 6 times (150)
Round 10: Work twisted scs back to beg of round (see round 8 of X-small for breakdown on how to work a twisted sc). Sl st into first twisted sc st to join. FO. (150)
MEDIUM ONLY
Round 1: Working into the flo around: [inc, sc 7] 12 times (108)
Round 2: Working in both loops again, sc around (108)
Round 3: [inc, sc 8] 12 times(120)
Round 4: Sc around (120)
Round 5: [inc, sc 9] 12 times (132)
Round 6: Sc around (132)
Round 7: [inc, sc 10] 12 times (144)
Round 8: Sc around (144)
Round 9: [inc, sc 11] 12 times (156)
Round 10: Work twisted scs back to beg of round (see round 8 of X-small for breakdown on how to work a twisted sc). Sl st into first twisted sc st to join. Sl st into first twisted sc st to join. FO. (156)

LARGE ONLY
Round 1: Working into the flo around: [inc, sc 7, inc, sc 8] 6 times (114)
Round 2 : Working in both loops again, sc around (114)
Round 3: [inc, sc 8, inc, sc 9] 6 times (126)
Round 4: Sc around (126)
Round 5: [inc, sc 9, inc, sc 10] 6 times (138)
Round 6: Sc around (138)
Round 7: [inc, sc 10, inc, sc 11] 6 times (150)
Round 8: Sc around (150)
Round 9: [inc, sc 11, inc, sc 12] 6 times (162)
Round 10: Sc around (162)
Round 11: [inc, sc 12, inc, sc 13] 6 times (174)
Round 12: Work twisted scs back to beg of round. (see round 8 of X-small for breakdown on how to work a twisted sc). Sl st into first twisted sc st to join. FO. (174)
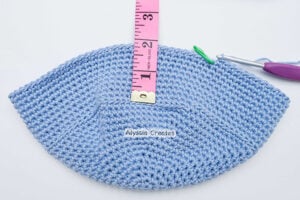
Option 2 – Wavy Brim:
The second option is for a more wavy brim. Each size will have different ending stitch counts; every 2 rounds will increase by 28 for the x-small, 30 for the small, 32 for the medium and 34 for the large. All sizes will follow the same sequence for when to place increases and will be worked to 2” long (you can modify brim length to preference). If you would like your brim to be even more wavy, you can modify pattern to have even more increases (for example, you could increase every other round as opposed to only increasing every 2 rounds).
ALL SIZES – X-SMALL, SMALL, MEDIUM AND LARGE:
Round 1: Working into the flo: [inc, sc 2] around (112, 120, 128, 136)
Round 2 – 3: Working into both loops again, sc around (112, 120, 128, 136)
Round 4: [inc, sc 3] around (140, 150, 160, 170)
Round 5 – 6: Sc around (140, 150, 160, 170)
Round 7: [inc, sc 4] around (168, 180, 192, 204)
Round 8 – 9: Sc around (168, 180, 192, 204)
Round 10: Work twisted scs back to beg of round. Sl st into first twisted sc st to join. FO. If preferred, work the round as regular sc. (168, 180, 192, 204)
All Done!
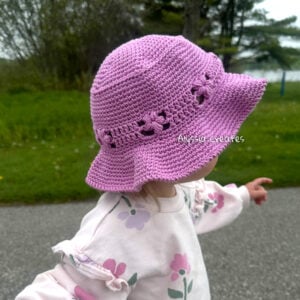
I hope you enjoyed creating this bucket hat – I would absolutely love to see the results! Please link to my website alyssiacreates.com and tag me @alyssia.creates on Instagram or Tiktok if you post your projects made using this pattern!
What’s next?
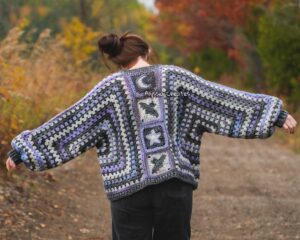
Pair this bucket hat to wear with my hexagon cardigan pattern!
Like what you learned? Pin for later!