This post may contain affiliate links. Should you make a purchase through one of these links, I may earn a small commission that supports me to keep making new content at no additional cost to you. For more info, please visit the Privacy Policy page.
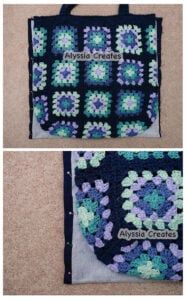
Would you like to add a fabric lining to your crochet bag but have no idea where to start? You are in the right place! In this demonstration, I will show you have to easily line your crochet bag step by step (for bags with and without a base) and offer tips on doing so with a sewing machine or by hand sewing.
What you will need:
- 100% Cotton Fabric (solid colours) , 100% Cotton Fabric (Cute Prints) – How much you need will depend on the size of your bag and if you would like to add pockets. As a Baseline, 1 yard should be more than enough.)
- Optional to add structure to lining: light-weight or mid-weight non-woven Iron-on fusible interfacing (I used Pellon 911FF Featherweight)
- Thread
- Tape measure
- Scissors (optionally shears)
- Sewing pins
- Sewing needle or Sewing machine (depending on chosen way to attach lining)
- Pencil
- Iron for fabric lining
What Yarn do I use for my Crochet Bags?
I recommend using cotton yarn for bag making as it’s a very durable and reliable option. Lion Brand 24/7 Cotton Yarn and Paintbox Yarns Cotton Aran are my absolute favourite go to cotton yarns for creating bags as they have an array of colour options available and are great quality! Adding a fabric lining while also using cotton yarn will certainly help the longevity of your crochet bags!

You can shop my ad-free printable PDF bag patterns here!
Back in early 2022, I crocheted a tote bag and added a lining into it for my mom and she has been using it everyday since – last month she ripped the lining and asked me to fix it. When I originally sewed the lining, I didn’t add interfacing because I was still new to the idea of lining my bags and hadn’t used interfacing before. Instead of just patching up the rip, I decided to remove the whole lining and completely redo it so I could add interfacing and while doing so, I documented the process to create this step by step guide so that you can add a lining to your bag as well! I now recommend the use of interfacing to add further durability to your bag though not required (I mean, her tote bag lasted 4 years of regular use before getting a rip!)
In this step by step demonstration, I will show how I add a fabric lining with boxed corners for bags with a base (this step can be omitted if your bag does not have a base). I will also link to other posts I have created so you can choose to add a pocket and or iron-on fusible interfacing (to add even more structure to your bag)! I use a sewing machine for this entire process but if you don’t have access to one and or if easier, it can be hand sewn.
Sewing Machine Settings + Hand Sewing
Sewing Machine:
- I use the straight stitch setting on my sewing machine with a stitch length and tension of 3 for creating and attaching the lining to my crochet bag. You may need to adjust these settings depending on the materials used to make your bag.
Hand sewing
- If hand sewing (recommended for those with little to no sewing experience), use a running stitch or back stitch to create the lining.
- When attaching lining to crochet bag, you can choose to still use a running/back stitch, or alternatively you can use an invisible stitch so you don’t have to worry about the thread appearing on the crochet side of your bag.
In addition to the following instructions, I also have 2 video tutorials for 2 different styles of linings for crochet bags if you need further clarity:
Creating Fabric Lining
Step 1:
Note: If using a fabric that has a right and wrong side, make sure the right side is facing inwards when sewing the fabric together.
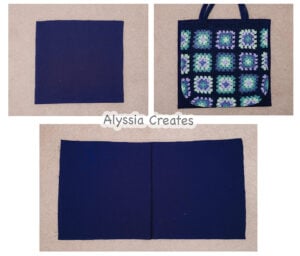
- Fold fabric with the folded edge towards the bottom.
- Place bag on the fabric with the bottom of the bag aligned with the fold of the fabric.
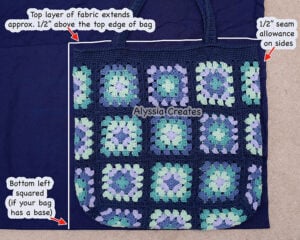
- The top layer of fabric should extend approx. 1/2″ above the top of the bag for the allowance.
- Trace around the sides of the bag leaving about 1/2” of an allowance but instead of rounding it off at the bottom, trace straight down to have the edge squared (so you can sew boxed corners later if your bag has a base). If it’s easier or depending on bag style, you can choose to follow the shape of the bag and omit the boxed corners step used later on.
Step 2:
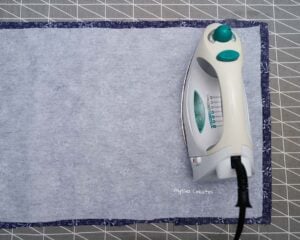
Cut fabric out (you can use shears to reduce fraying). Iron fabric.
Note: It’s at this point where I would add interfacing to my lining (open your lining up to lay flat to do so), to learn how to add interfacing check out this post: How to Apply Iron-On Fusible Interfacing to Fabric
Once you have added the interfacing – fold your fabric back in half (right sides facing inward). Iron fold line so it stays in place and so it can be used as a reference point (optional)
If you do not want to add interfacing, continue to next steps.
Step 3:
Fold top edge of both sides of fabric 1/2” over to wrong side. Iron into place.
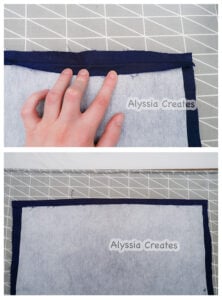
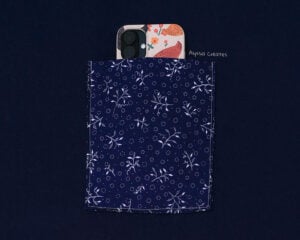
Note: It’s at this point where I would add the pockets to my lining, to learn how to add an easy pocket check out this post: How to Sew an Easy Pocket
Make sure to place pocket high enough (above the middle of the lining when lining is open) so that the bottom of your pocket doesn’t end up sitting on the base of your bag (if your bag has a base)!
Once you have added the pockets – fold your fabric back in half.
If you do not want to add the pockets, continue to next steps.
Step 4:
Put bag back on top of fabric. Leaving the top unpinned, pin together both sides of the lining in accordance to the edge (again, if your bag has a base, still keep the lining squared along the bottom so you can add boxed corners).
Step 5:
Sew together both sides of the lining following the pins. If hand sewing, I recommend using a running or back stitch.
Creating Boxed Corners For Bag Base (if applicable)
Note: Steps 6-10 will showcase how to make the lining have boxed corners (so the lining will have a base just like your bag). In addition to the instructions below, for a more visual representation on how to do this, I have video tutorial on my YouTube Alyssia Creates that showcases this method for a similar style of bag (timestamp 6:14 – 10:21) titled How to Line a Crochet Bag with a Base (Boxed Corners) – Tutorial
Link: https://www.youtube.com/watch?v=dKd_sUuWrfw&t=374s
If your lining doesn’t have a base, skip to “Attaching Lining into Bag” to begin pinning lining inside your crochet bag.
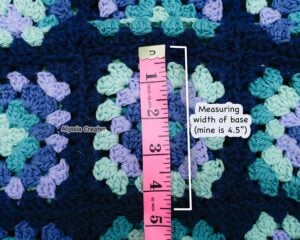
Step 6:
Start by measuring the width of your base (mine is 4.5”). Note: since my bag is constructed with granny squares, I am measuring the width of one my squares throughout as that would be the same width for the base.
Step 7:
- With your lining open, follow the side seam down to flatten it out into a triangular shape as pictured below.
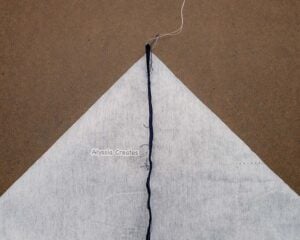
- From one side to the other on the triangle, measure the width of what your base was (making sure the half way mark of your measurement aligns with the seam in the middle).
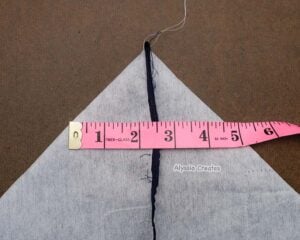
- Draw a line across and pin into place. Rep on other side.
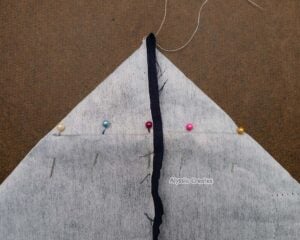
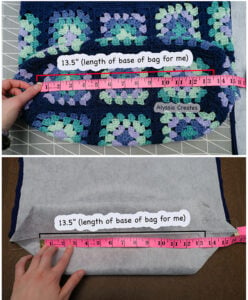
Step 8:
Before sewing, measure the length of your base (I’m doing this by measuring the 3 base granny squares of my bag – this measures to about 13.5” for me). Measure the bottom of the lining from the top of the pin on one side to the top of the pin on the other side – it should also measure to the same as your base (if it doesn’t, adjust triangle tab pins accordingly).
Step 9:
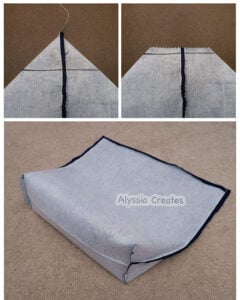
Sew along the pins/line where the triangle shape is on both sides to create your base (I sew this line twice).

Step 10:
Cut the triangular corner tabs off about 1/2” outside the line that you just sewed.
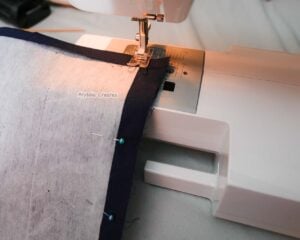
Attaching Lining into Bag
Step 1:
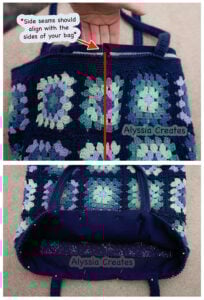
Put lining inside bag (right side should remain inwards). Align the side seams of lining to the sides of your bag. If you created a base, the base of lining should align with the base of the bag. Begin pinning the lining to your bag.
Step 2:
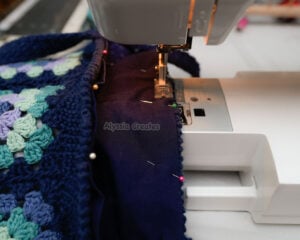
Sew the lining into your bag following along the pins (if using sewing machine, place crochet part facing downwards). Tip: I try to colour match my bobbin thread with the yarn colour of my bag. If hand sewing, I recommend to use an invisible stitch to attach liner into bag (so that you can sew partially through the crochet part of your bag and not fully stitch through to the other side avoiding thread appearing on the outside).
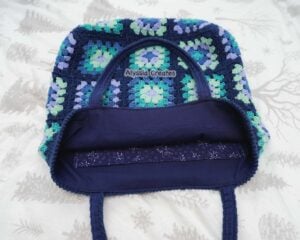
All Done!
I hope you enjoyed lining your crochet bag using these instructions – I would absolutely love to see the results! Please link to my website alyssiacreates.com and tag me @alyssia.creates on Instagram or Tiktok if you post your lined bags!
Like what you learned? Pin for later!