This post may contain affiliate links. Should you make a purchase through one of these links, I may earn a small commission that supports me to keep making new content at no additional cost to you. For more info, please visit the Privacy Policy page.
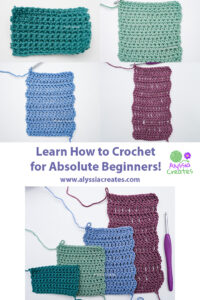
As my first blog post, I wanted to introduce the very basics of crochet to those who want to learn but don’t know where to start. Here you’ll find all that you need to know to start crocheting in no time! I will go over the basics of yarn weight, hook sizes, the fundamental stitches that are used in the majority of patterns and more!
What Yarn Should I Use to Start Crocheting?
I recommend to start off with a medium weight level 4 yarn as beginner in crocheting.
But what does this mean? Yarn weight is determined by the thickness of the strand, not the actual weight of the yarn. These are the common yarn weights:
- 0 (lace)
- 1 (super fine)
- 2 (fine)
- 3 (Light)
- 4 (Medium)
- 5 (Bulky)
- 6 (Super Bulky)
- 7 (Jumbo)
Now, there are also many different yarn fibres to choose from, which can be good for different things depending on the project you are making. For the most easily accessible and affordable yarn, I would start with an acrylic yarn. This is good for most crochet projects!
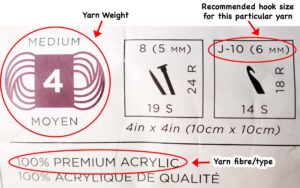
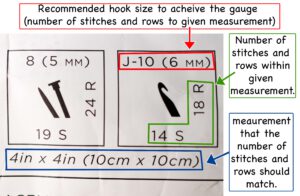
When you go yarn shopping, you may be confused and overwhelmed by all of the options and that can make it daunting to start. If you look at the label on the yarn, it will tell you a lot of useful information, such as what weight it is, what the recommended hook size to use is and also what fibre it is. That label will look something like this:
What Crochet Hook Do I Use?
Refer to the label on your yarn to determine what the recommended hook size is. If we stick with my recommendation of using an acrylic medium weighted 4 yarn, usually the recommended hook size will be a 5.00 mm / H hook, 5.50 mm / I hook or a 6.00 mm / J crochet hook. Here are the common hook sizes listed:
- 2.25 mm / B
- 2.75 mm / C
- 3.25 mm / D
- 3.50 mm / E
- 3.75 mm / F
- 4.00 mm / G
- 5.00 mm / H
- 5.50 mm / I
- 6.00 mm / J
- 6.50 mm / K
- 8.00 mm / L

As a rule of thumb, the thicker the yarn you are using, the bigger the crochet hook you will need.
To simplify – here is the supply list of what you will need:
Yarn – Acrylic Medium Weight Level 4 Yarn
Hook:
- H / 5.00 mm, I / 5.50 mm, or K / 6.00mm hook (depending on the suggested hook size on the label)
Some other useful tools:
- Tapestry needle (to weave in ends)
- stitch markers
- Tape measure
- Scissors
Note: For the sake of this demonstration to ensure the stitches are defined and can easily be seen in my photographs, I will be using Lion Brand 24/7 Cotton yarn. This is a medium weight cotton yarn that recommends a 4.00 mm crochet hook. As a beginner, I would not suggest starting with cotton yarn because it’s much stiffer and harder to work with especially when you are just starting out. I recommend starting with an acrylic yarn.
Fundamental Stitches/Terminology and Their Abbreviations:
Note: The following is written in US crochet terms.
- Slip knot
- Chain (Ch)
- Slip Stitch (sl st)
- Single Crochet (sc)
- Half Double Crochet (hdc)
- Double Crochet (dc)
- Triple Crochet (tc)
- Yarn over (yo)
- Working yarn = the strand that is still connected to the yarn ball/skein
- Yarn end/tail = the end of the yarn
Notes:
- This demonstration is from a right handed crochet perspective and uses US terms
- Photo steps/breakdowns are included below most text steps.
How Do I Hold the Crochet Hook?
There are two main ways to hold a crochet hook, it doesn’t matter which you go for, it’s whatever is more comfortable for you! The two common holds are the pencil grip and the knife grip.
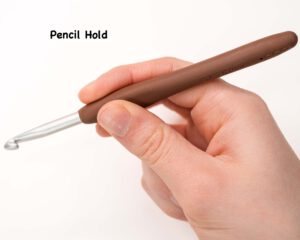
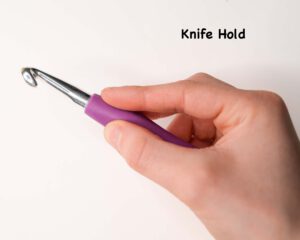
I personally use the knife hold, but hold the hook however feels best to you!
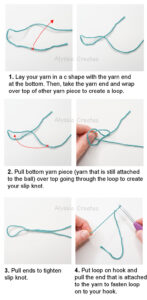
Creating a Slip Knot
Before you start actually crocheting, you will need to make a slip knot.
To start, pull a length of about 6″-10″ of yarn from your ball and then follow steps pictured below:
How Do I Hold the Yarn While I Crochet?
Follow steps below:

As you crochet, allow the working yarn to glide through your fingers so that more yarn becomes available as you go.
Note: personally, I like to only keep the working yarn draped over my index finger as indicated in the first photo and then I curl my ring and pinky finger to hold the working yarn to create tension. I find this to be more comfortable – but as a beginner to ensure you have more control of your tension – it is probably best to start with the above photo steps.
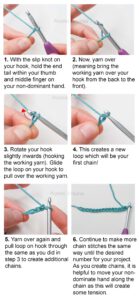
Foundation Chain (abbreviated as Ch)
Next, we will learn how to make our starting chain, which will create the foundation of your project. Apply what we learned with how to hold your hook, how to hold the yarn and how to create a slip knot.
Tips to remember:
- When creating your chains, keep in mind your tension, which means how tightly or loosely you hold your yarn and crochet your stitches. If your tension is too tight, it will be harder to complete your stitches as a beginner and it will also be harder to work additional rows into the foundation chain. If your tension is too loose, this can also make it harder for you – but be patient, finding a tension that feels right and works for you can take some practice!
- As you crochet, allow the working yarn to glide through your non-dominant hand that is holding the yarn so that more yarn becomes available as you go.
Let’s begin!
Note: Moving forward, I will have steps of text for explanation accompanied by broken down photo steps for a visual representation.
- With the slip knot on your hook, hold the end tail within your thumb and middle finger on your non-dominant hand.
- Yarn over (meaning bring the working yarn over your hook from the back to the front).
- Rotate your hook slightly inwards to hook the working yarn as you glide the loop on your hook to pull over the working yarn.
- Yarn over again and pull loop on hook through to create additional chains.
- Continue this process for the desired number of chains for your project. As you create chains, it’s helpful to move your non dominate hand along the chain as this will create some tension. Also, allow the working yarn to glide through your non-dominant hand that is holding the yarn so that more yarn becomes available as you go.
Note: Don’t be discouraged if your stitches don’t appear neat right away, it can definitely take practice to keep your tension consistent which in turn will make your stitches neater.
Before moving forward, I would recommend to really master your chain stitches until you feel comfortable!
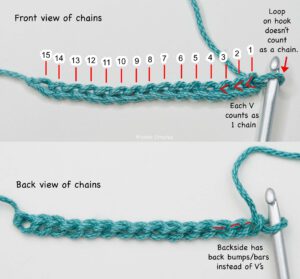
Counting your Chain
For the sake of this test swatch, chain 15 total. Note: do not count the loop on your hook as a chain. It’s also worth noting that the front side of your chain is the side that has the little V’s, the backside has little bumps/bars as opposed to V’s. You want to stay working into the V side (sometimes patterns will ask to work into the back of the chain, but for the most part, you will work into the front).
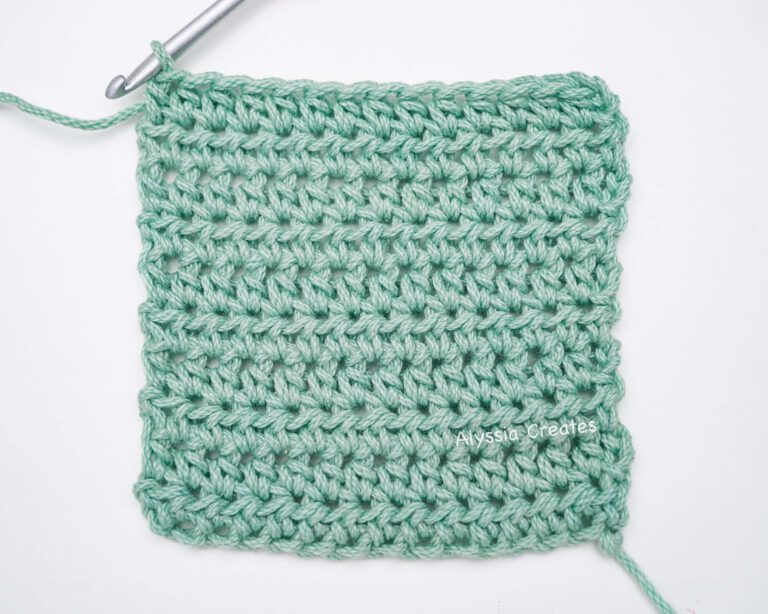
Single Crochet (abbreviated as SC)
After creating your foundation chain, we will now learn a single crochet stitch! We will be working into that foundation chain that you just created.
Tip: When working into your foundation chain, make sure to not twist your chains. Remain working into the front side with the V’s.
Since you made 15 chain stitches, you will end up with 14 single crochet. This is because you will work into the second chain from the hook to create your first single crochet. So if you wanted to have 15 single crochet in your row, you would chain 15 + 1 for a total of 16 chains. In other words, as a rule of thumb when using single crochet, you would chain the amount you want your row to be and then add 1 more chain. See instructions below to make more sense of this:
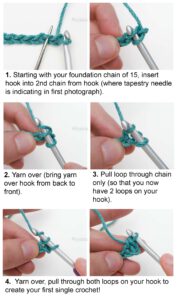
Start of Row 1:
- Starting with your foundation chain of 15, insert hook into the 2nd chain from hook.
- Bring yarn over hook from back to front and then pull loop through chain only (so that you now have 2 loops on your hook).
- Yarn over, pull through both loops on your hook to create your first single crochet!
- Tip: You can add a stitch marker into your first stitch so that when you work your next row, you know what will be the last stitch that you need to work into.
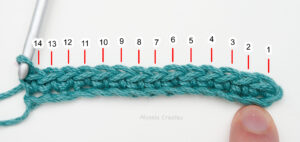
Row 1 Continued:
Continue to single crochet into the remaining 13 chains for 14 single crochet across total (insert hook into work. Yarn over and pull loop through work so that you have 2 loops on hook. Yarn over again and pull through both loops). Make sure to not twist your chains as you work along the foundation chain.
Turning Chain:
After you create each row and before starting the next, you will need to turn your work and add a chain 1. This chain 1 brings you to the height of a single crochet. How much you chain before each row depends on the height of the stitch you are using. For instance: single crochet = 1 chain, half double crochet = 2 chains, double crochet = 3 chains, triple crochet = 4 chains.
For the sake of this tutorial, the chain 1 will not count as a stitch, however, some patterns may count it as stitch.
What do you mean by turning your work?
This means to flip the work over to the opposite side so that you can work the next row going in the same direction. To further clarify, your last stitch of the previous row will now become the first stitch of the new row. It doesn’t matter which way you turn (clockwise or counterclockwise), however try to stay consistent with the direction you turn.
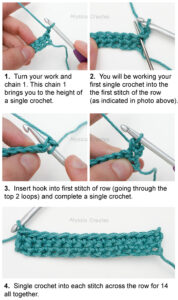
Row 2:
- Turn your work and chain 1.
- Working into the top of each stitch (going through the 2 loops), single crochet into the next 14 stitches across to bring you to the end of the row.
Row 3 – Row 10 (or however many rows you would like to make):
Turn your work, chain 1 to get you to the height of a single crochet. Single crochet into each stitch for 14 across.
Tip: Make sure to count the stitches in each row to ensure you haven’t missed a stitch or added an extra stitch! Keep practicing for consistency.
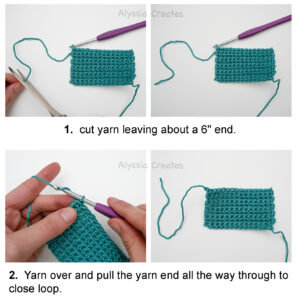
How to Fasten Off
Once you have completed your project, cut yarn leaving about a 6″ end. Then, yarn over and pull the yarn end all the way through to close loop.
Weaving in the Yarn Ends
After you have fastened off, it’s the most dreadful part of all (at least for me). It’s time to weave in your ends!
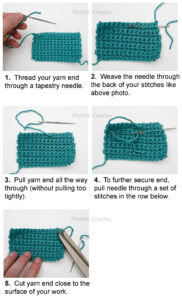
- Thread your yarn end through a tapestry needle.
- Pull the needle through a set of stitches at the back of your work (make sure not to pull too tight).
- To further secure end, pull needle through a set of stitches in the row below going the opposite way.
- Cut yarn end close to the surface of your work.
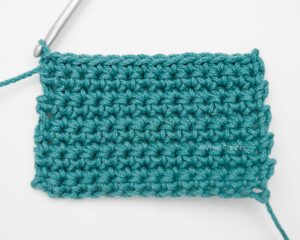
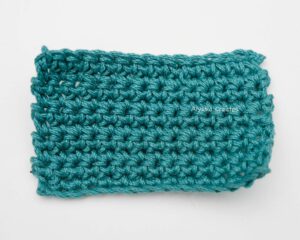
Voila!
You have completed your first crochet swatch!
Understanding Gauge
When you begin to follow crochet patterns, an important factor to maintaining the same dimensions of the end result for the pattern is to keep in mind the gauge of the pattern and your tension. Most people have different tensions when they crochet – some crochet tighter and some crochet looser.
With that said, when you follow a pattern, there will be a recommended hook size, yarn weight and gauge. In order to ensure that your work ends up being the correct dimensions, it is recommended to do a gauge swatch based on the gauge given in the pattern using the recommended hook size/yarn weight. You may end up needing to size up or size down your hook to be able to match the pattern’s gauge.
The gauge will usually be specified as a number of stitches and a number of rows within a certain measurement.
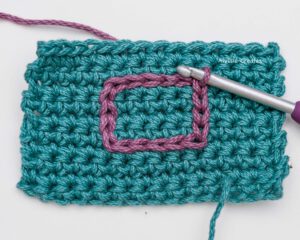
For example:
- 14 stitches x 18 rows equaling to the size of a 4 inch x 4 inch square
So based on that measurement given, you would create a swatch of that amount of stitches and that amount of rows and then lay your work flat and measure it – if your measurement differs from the gauge, that is when you know you need to adjust your hook size.
Similarly to when following a pattern, when you purchase yarn there will usually be an indication of the gauge on the label. Just like when following a pattern, though the yarn has a recommended hook size, if when creating a gauge swatch your measurement ends up being different then what is on the label, this may dictate whether or not you want to use a different hook then the recommended one to match the gauge.
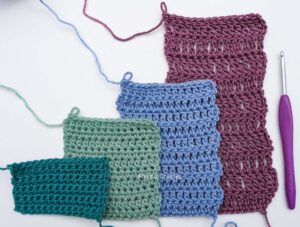
What’s next?
When you are ready, jump into learning the next set of fundamental stitches of crochet; half double crochet, double crochet, triple crochet and then a slip stitch!
Half Double Crochet (abbreviated as hdc)
Half double crochet is relatively similar to a single crochet. However, before starting your stitch you would add a yarn over and then insert your hook to pull up a loop. So instead of having 2 loops on your hook, you would have 3! A half double crochet has a little more height than a single crochet, but it is a bit shorter than a double crochet. It is a great go to stitch for a lot of projects!
Click here to get a full tutorial on how to do a half double crochet starting from a foundation chain.

Double Crochet (abbreviated as dc)
Double crochet is another very common stitch, I probably use this stitch the most! I absolutely love making granny squares and a double crochet is your best friend for granny squares. Like a half double crochet, to start your stitch add a yarn over before inserting hook to then pull up a loop. Then, yarn over and only pull through 2 loops, leaving 2 loops still on your hook. Then yarn over again, and pull through the remaining 2 loops.
Click here to get a full tutorial on how to do a double crochet starting from a foundation chain.

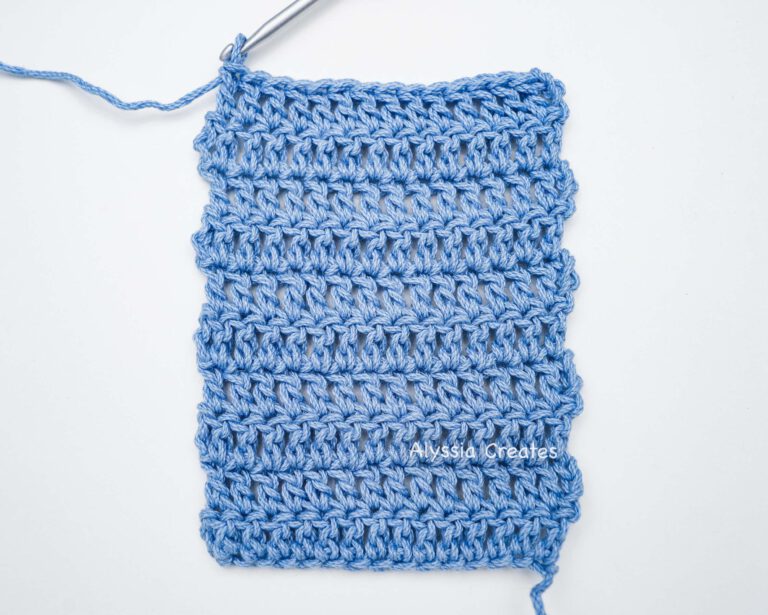
Triple Crochet (abbreviated as tc)
Triple crochet is the next stitch to learn! Sitting the tallest out of the previous stitches learned, it comes in handy for many projects. To start your triple crochet, you would yarn over twice before inserting your hook to then pull up a loop (leaving 4 loops on your hook). Like the double crochet, you would yarn over and only pull through 2 loops, now leaving 3 loops on your hook. Then, yarn over again, and pull through the next 2 loops, 2 times.
Click here to get a full tutorial on how to do a triple crochet starting from a foundation chain.
Slip Stitch (abbreviated as sl st)
A slip stitch sits the shortest out of all the crochet stitches and is used in most patterns, either to join in a round, as a decorative element to add details on the surface of your project or to allow you to move to a different part of your work without adding any additional height. You can crochet rows of slip stitches, however it would take a while and would also be quite dense – but sometimes this may have it’s purpose!
To slip stitch all you need to do is:
Insert hook into stitch. Then yarn over to pull the loop through both the stitch and the working loop that is currently on your hook. Click here for a more visual representation on how to make a slip stitch and some of it’s different uses:
Like what you learned? Pin for later!