This post may contain affiliate links. Should you make a purchase through one of these links, I may earn a small commission that supports me to keep making new content at no additional cost to you. For more info, please visit the Privacy Policy page.
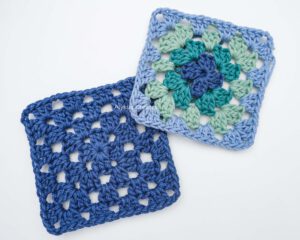
After learning the basics of how to crochet, let’s learn how to make a traditional granny square to get you started into the world of so many amazing granny square designs! I will go through how to make this granny square using one colour and then will also go over how you would add different colours for each round.
What Yarn Am I Using?
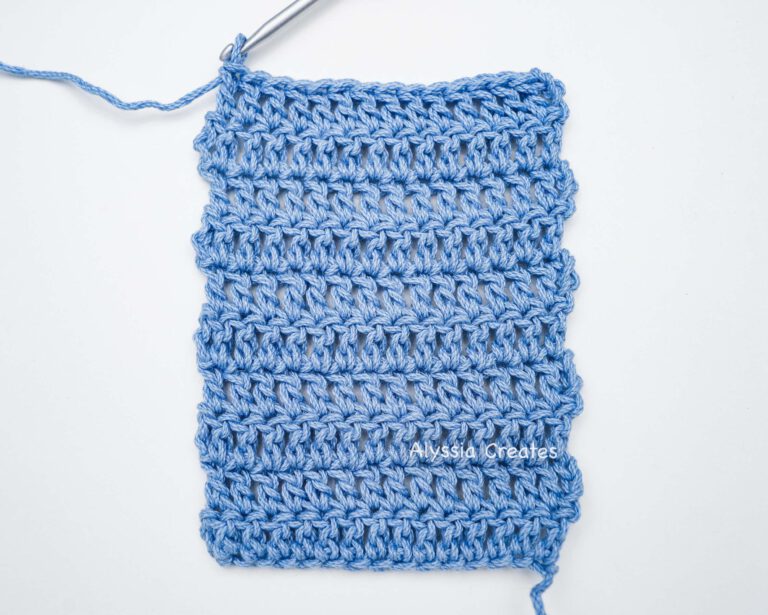
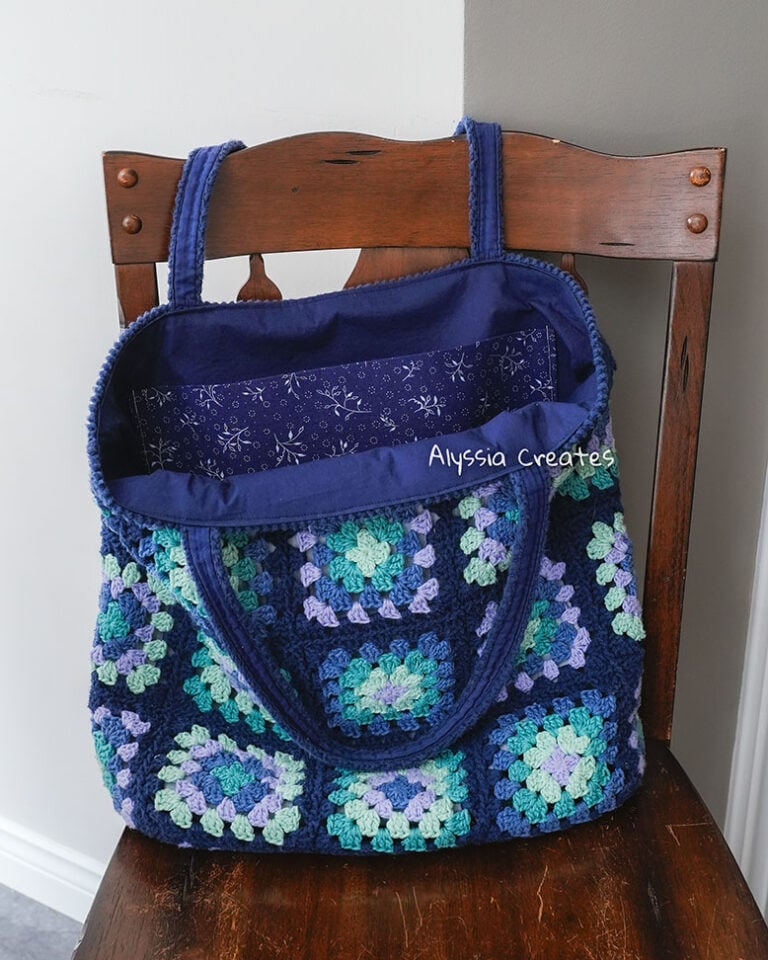
I am using Lion Brand 24/7 Cotton Yarn. It is my absolute favourite go to yarn for creating just about anything. It’s a quality mercerized 100% cotton yarn that is durable and amazing for making crochet bags, which is what I tend to make the most!
Difficulty Level
- Easy/Advanced Beginner
Supply List:
Yarn/Material – Lion Brand 24/7 Cotton Yarn (medium weight level 4 yarn):
Hook:
Other:
- Scissors
- Tapestry needle (to weave in ends)
- Tape measure
Stitches Used/Abbreviations (US Terms):
- ch = Chain
- st(s) = Stitch(es)
- sl st = Slip Stitch
- dc = Double Crochet
- yo = Yarn Over
- FO = Fasten off
- sp(s) = Space(s)
- Rep = Repeat
- Cont = Continue
- Prev = Previous
- Yarn over = (yo)
- Working yarn = the strand that is still connected to the yarn ball/skein
- Yarn end/tail = the end of the yarn
- * = Repeat Instructions
- (…) = sts within parenthesis to be worked all into the same indicated st/sp
Notes:
- This demonstration is from a right handed crochet perspective and uses US terms
- Photo steps with breakdowns are included below text instructions for those who are more visual learners.
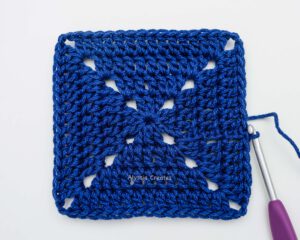
Traditional Granny Square Pattern (using only one colour):
Round 1:
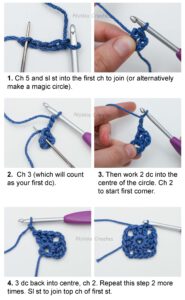
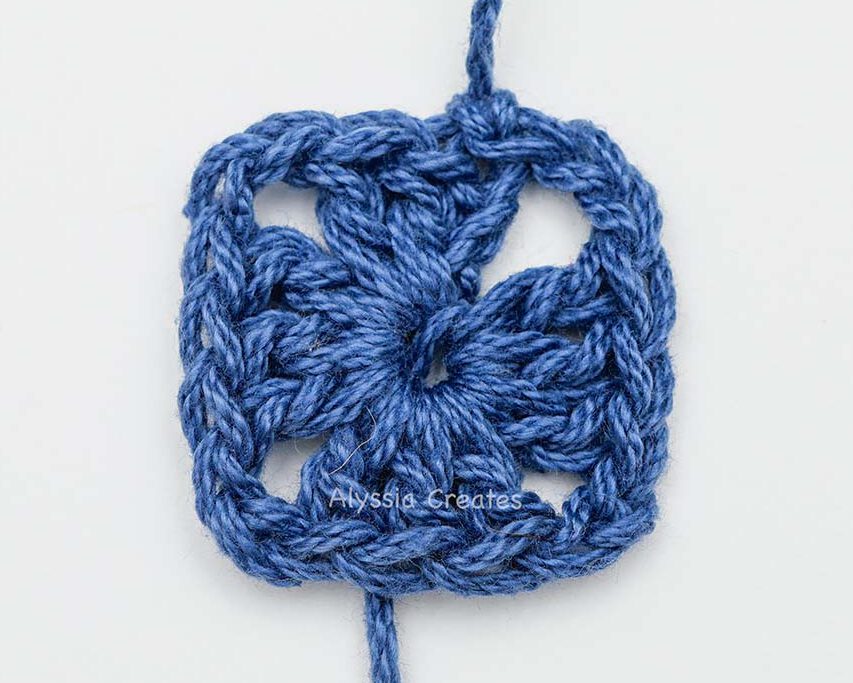
- Ch 5 and sl st into the first ch to join (or alternatively make a magic circle).
- Ch 3 (which will count as your first dc).
- Then work 2 dc into the centre of the circle. Ch 2 to start first corner.
- * 3 dc back into centre, ch 2. Repeat from * 2 more times.
- Sl st to join top ch of first st. Do not Fasten off. (Tip: Work your stitches over the yarn end so that once your first round is complete, you can pull the tail to close the circle).
Round 2:
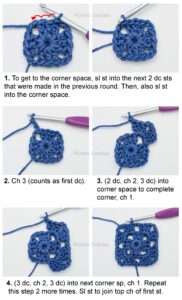
- To get to the corner space, sl st into the next 2 dc sts that were made in the previous round. Then, also sl st into the corner space as well.
- Ch 3 (counts as first dc). (2 dc, ch 2, 3 dc) into corner space to complete corner, ch 1.
- *(3 dc, ch 2, 3 dc) into next corner space, ch 1. Repeat from * 2 more times.
- Sl st to join top ch of first stitch.
Round 3:
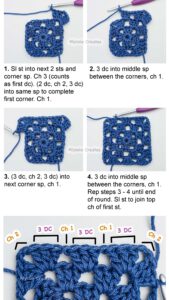
- Sl st into next 2 sts and the corner space as you did in the previous round.
- Ch 3 (counts as first dc). (2 dc, ch 2, 3 dc) into same space to complete first corner, ch 1.
- 3 dc into middle space between the corners of previous round, ch 1.
- * (3 dc, ch 2, 3 dc) into next corner space, ch 1, 3 dc into middle space between the corners, ch 1. Repeat from * 2 more times.
- Sl st to join top ch of first st.
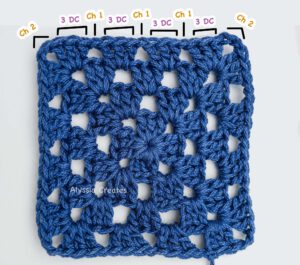
Round 4 onwards:
The process onwards will basically be the same as round 3. Upon completing each round, you will gain an additional space in between the corners of each side of the granny square. So, continue making the granny square as large as you want by repeating the same process as round 3 but adding an additional (3 dc, ch 1) into the new spaces made in between the corners of each round.
In other words, you would continue to work (3 dc, ch 2, 3 dc) into the corner spaces and then (3 dc, ch 1) into each space in-between the corners. Fasten off once you have made the granny square to the preferred size. Weave in ends.
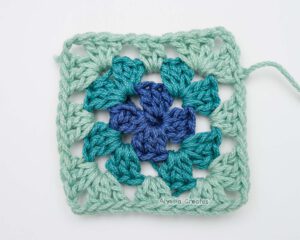
How to Add Different Colours for Each Round of Granny Square
To add different colours each round, it’s basically the exact same process as previously shown – just with fastening off after each round and then attaching a new colour into the corner to start next round. Follow steps below for full instructions:
Round 1:
- Staring with Yarn A, ch 5 and sl st into the first ch to join (or alternatively make a magic circle).
- Ch 3 (which will count as your first dc).
- Then work 2 dc into the centre of the circle, ch 2 to start first corner.
- * 3 dc back into centre, ch 2. Repeat from * 2 more times.
- Sl st to join top ch of first st. Fasten off. (Tip: Work your stitches over the yarn end so that once your first round is complete, you can pull the tail to close the circle).
Round 2:
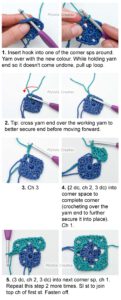
- To start round 2, insert hook into one of the corner spaces around. Yarn over with Yarn B. While holding yarn end so it doesn’t come undone, pull up loop.
- Tip: cross yarn end over the working yarn to secure end.
- Then ch 3 (counts as first dc). (2 dc, ch 2, 3 dc) into corner space to complete corner (crocheting over the yarn end to further secure it into place).
- *(3 dc, ch 2, 3 dc) into next corner space, ch 1. Repeat from * 2 more times.
- Sl st to join top ch of first st. Fasten off.
Round 3:
- Join Yarn C the same way as previous round.
- Ch 3 (counts as first dc). (2 dc, ch 2, 3 dc) into corner space to complete first corner, ch 1.
- 3 dc into middle space between the corners, ch 1.
- * (3 dc, ch 2, 3 dc) into next corner space, ch 1, 3 dc into middle sp between the corners, ch 1. Rep from * 2 more times.
- Sl st to join top ch of first st. Fasten Off.
Round 4 onwards:
The process onwards will basically be the same as round 3. Upon completing each round, you will gain an additional space in between the corners of each side of the granny square. So, continue making the granny square as large as you want by repeating the same process as round 3 but adding an additional (3 dc, ch 1) into the new spaces made in between the corners of each round.
In other words, you would continue to work (3 dc, ch 2, 3 dc) into the corner spaces and then (3 dc, ch 1) into each space in-between the corners. Fasten off once you have made the granny square to the preferred size. Weave in ends.

Written Pattern (One Colour)
Round 1:
Ch 5 and sl st into the first ch to join (or alternatively make a magic circle). Ch 3 (which will count as your first dc). Then work 2 dc into the centre of the circle, ch 2 to start first corner. * 3 dc back into centre, ch 2. Rep from * 2 more times. Sl st to join top ch of first st. Do not FO.
Round 2:
To get to the corner sp, sl st into the next 2 dc sts that were made in the prev round. Then, also sl st into the corner sp. Ch 3 (counts as first dc). (2 dc, ch 2, 3 dc) into same sp to complete corner, ch 1. *(3 dc, ch 2, 3 dc) into next corner sp, ch 1. Rep from * 2 more times. Sl st to join top ch of first st.
Round 3:
Sl st into next 2 sts and the corner sp as you did in prev round. Ch 3 (counts as first dc). (2 dc, ch 2, 3 dc) into corner sp to complete first corner, ch 1. 3 dc into middle sp between the corners, ch 1. * (3 dc, ch 2, 3 dc) into next corner sp, ch 1, 3 dc into middle sp between the corners, ch 1. Rep from * 2 more times. Sl st to join top ch of first st.
Round 4 onwards:
continue making the granny square as large as you want by repeating the same process as round 3 but adding an additional (3 dc, ch 1) into the new sps made in between the corners of each round. So in other words, you would continue to work (3 dc, ch 2, 3 dc) into the corner sps and then (3 dc, ch 1) into each sp in-between the corners. FO once you have made the granny square to the preferred size. Weave in ends.
Written Pattern (Multi-Colour)
Round 1:
Staring with Yarn A, ch 5 and sl st into the first ch to join (or alternatively make a magic circle). Ch 3 (which will count as your first dc). Then work 2 dc into the centre of the circle, ch 2 to start first corner. * 3 dc back into centre, ch 2. Rep from * 2 more times. Sl st to join top ch of first st. FO. (Tip: Work your stitches over the yarn end so that once your first round is complete, you can pull the tail to close the circle).
Round 2:
To start round 2, insert hook into one of the corner sps around. Yarn over with Yarn B. While holding yarn end so it doesn’t come undone, pull up loop (Tip: cross yarn end over the working yarn to secure end). Then ch 3 (counts as first dc). (2 dc, ch 2, 3 dc) into corner space to complete corner (crocheting over the yarn end to further secure it into place). *(3 dc, ch 2, 3 dc) into next corner sp, ch 1. Repeat from * 2 more times. Sl st to join top ch of first st. FO.
Round 3:
Join Yarn C the same way as prev round. Ch 3 (counts as first dc). (2 dc, ch 2, 3 dc) into same sp to complete first corner, ch 1. 3 dc into middle sp between the corners, ch 1. * (3 dc, ch 2, 3 dc) into next corner sp, ch 1, 3 dc into middle sp between the corners, ch 1. Rep from * 2 more times. Sl st to join top ch of first st.
Round 4 onwards:
continue making the granny square as large as you want by repeating the same process as round 3 but adding an additional (3 dc, ch 1) into the new sps made in between the corners of each round. So in other words, you would continue to work (3 dc, ch 2, 3 dc) into the corner sps and then (3 dc, ch 1) into each sp in-between the corners. FO once you have made the granny square to the preferred size. Weave in ends.
What’s next?
After learning how to create a traditional granny square, learn how create a Solid Granny Square!
Like what you learned? Pin for later!