This post may contain affiliate links. Should you make a purchase through one of these links, I may earn a small commission that supports me to keep making new content at no additional cost to you. For more info, please visit the Privacy Policy page.
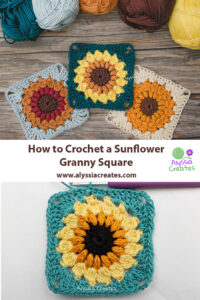
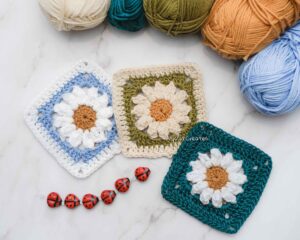
Let’s learn how to crochet a sunflower granny square. Perfect for all of your summer projects such as making bags, cardigans, blankets and so much more! The opportunities of what you can make are endless! If you haven’t crocheted before, start with my beginner series to learn how to crochet!
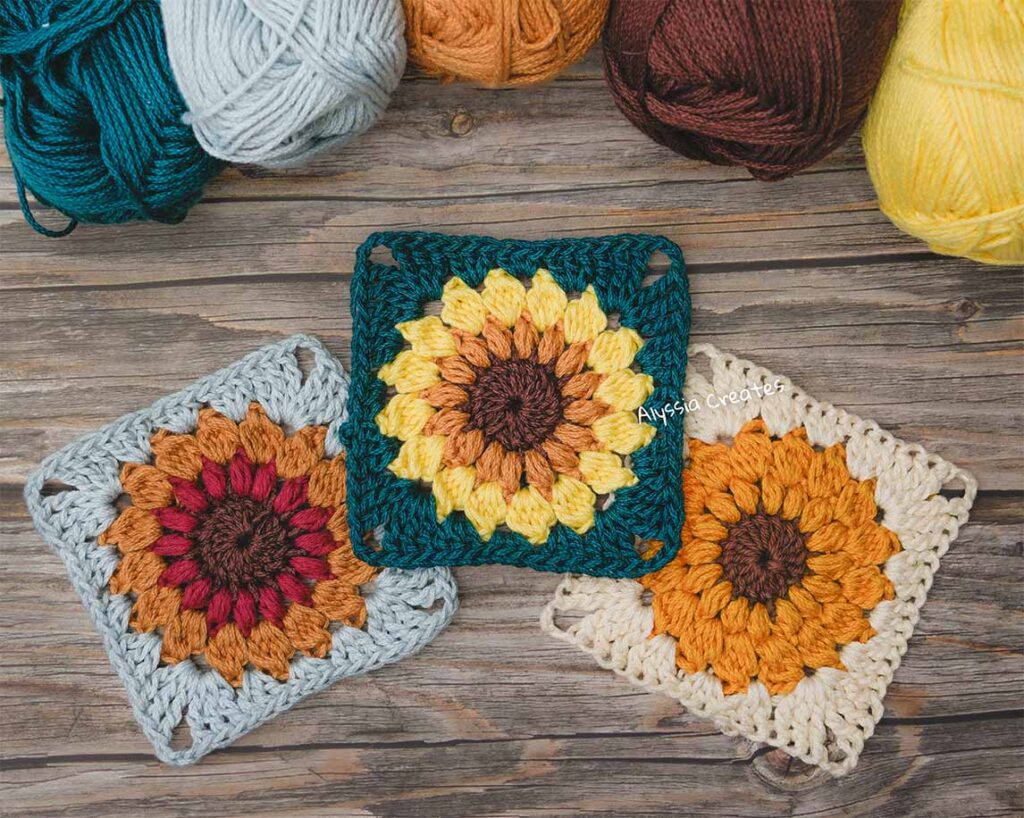
This sunflower granny square is compatible to include in projects with the solid granny square free pattern (up until round 4), daisy granny square, heart granny square and also my growing collection of granny square designs (in my pattern shop)!
What Yarn Am I Using?
I am using Lion Brand 24/7 Cotton Yarn. It is my absolute favourite go to yarn for creating just about anything. It’s a quality mercerized 100% cotton yarn that is durable and amazing for making crochet bags, which is what I will be doing with these granny squares!
You can purchase an ad-free printable PDF version of my drawstring backpack pattern featuring this granny square here!
Difficulty Level
- Advanced Beginner/Intermediate
Supply List:
Yarn/Material (for one square) – Lion Brand 24/7 Cotton Yarn (worsted weight level 4 yarn):
- Yarn A – Approx 2g/3.8 yds (Black – centre of sunflower)
- Yarn B – Approx 3g/5.7 yds (Goldenrod – inner petals)
- Yarn C – Approx 4g/9.5 yds (Lemon – outer petals)
- Yarn D – Approx 4g/9.5 yds (Jade – background)
Hook:
Other:
- Tapestry needle (to weave in ends)
- Tape measure
- Scissors
Finished Measurement:
- Final square measures to about 4″ x 4″ (this can vary depending on yarn you use and or tension)
Stitches Used/Abbreviations (US Terms):
- Magic Circle
- ch = Chain
- st(s) = Stitch(es)
- sl st = Slip Stitch
- sc = Single Crochet
- hdc = Half Double Crochet
- dc = Double Crochet
- tc = Triple Crochet
- ps = Puff Stitch
- bo = Bobble Stich
- yo = Yarn Over
- FO = Fasten off
- sk = Skip
- sp(s) = Space(s)
- Rep = Repeat
- Cont = Continue
- Prev = Previous
- * = Repeat Instructions
- Beg = Beginning
- (…) = sts within parenthesis to be worked all into the same indicated st/sp
- […] = Repeat instructions within brackets the indicated amount of times
Special Stitches:
- ps = Puff Stitch – [Yo, insert hook into st, pull up loop] 3 times (7 loops on hook). Yo, pull through all loops to complete puff stitch.
- bo = Bobble Stitch – [Yo, insert hook into st, pull up loop, yo, pull through 2 loops] 4 times (5 loops on hook). Yo, pull through all 5 loops to complete bo st.
Pattern Notes:
- This pattern is written in US terms and is worked in rounds.
- I would recommend to block your squares for best results.
- Photo steps/breakdowns are included below each round. Photographs are from a right handed crochet perspective.
Visual Sunflower Granny Square Pattern:
Round 1:
Using Yarn A and a 4mm crochet hook, make magic circle (alternatively, ch 5, sl st to first ch). Ch 3 (acts as first dc), 15 dc into the centre of the circle. Sl st into top ch of first st to join, pull tail to close circle. FO. (16 dc)

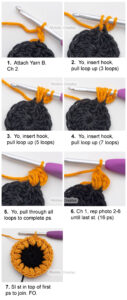
Round 2:
Attach Yarn B to any st. Ch 2 and work ps into same st as just attached, ch 1 to lock into place. (ps, ch 1) in each dc st until end of round. Sl st into top of first ps. FO. (16 ps)
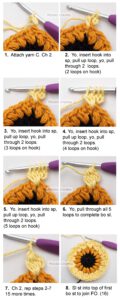
Round 3:
Attach Yarn C to any ch 1 sp. Ch 2, work a bo st into same sp, ch 2. (bo, ch 2) in each ch 1 sp until end of round. Sl st into top of first bo st. FO. (16 bo)
Round 4:
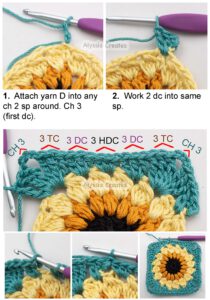
Attach Yarn D into any ch 2 sp. Ch 3 (counts as first dc), work 2 dc into same sp. * (3 tc, ch 3, 3 tc) in next sp to form corner. 3 dc into next sp, 3 hdc in next, 3 dc in next. Rep from * until end of round. Last sp will be 3 hdc. Sl st to join top ch of first st. FO. (15 sts across each side not including the corner chs)
Make a Sunflower Zipper Pouch following this tutorial!
Written Sunflower Granny Square Pattern:
Round 1:
Using Yarn A and a 4mm crochet hook, make magic circle (alternatively, ch 5, sl st to first ch). Ch 3 (acts as first dc), 15 dc into the centre of the circle. Sl st into top ch of first st to join, pull tail to close circle. FO. (16 dc)
Round 2:
Attach Yarn B to any st. Ch 2 and work ps into same st as just attached, ch 1 to lock into place. (ps, ch 1) in each dc st until end of round, sl st into top of first ps. FO. (16 ps)
Round 3:
Attach Yarn C to any ch 1 sp. Ch 2, work a bo st into same sp, ch 2. (bo, ch 2) in each ch 1 sp until end of round, sl st into top of first bo st. FO. (16 bo)
Round 4:
Attach Yarn D into any ch 2 sp. Ch 3 (counts as first dc), work 2 dc into same sp. * (3 tc, ch 3, 3 tc) in next sp to form corner. 3 dc into next sp, 3 hdc in next, 3 dc in next. Rep from * until end of round. Last sp will be 3 hdc. Sl st to join top ch of first st. FO. (15 sts across each side not including the corner chs)
What’s next?
If you haven’t already, learn how create a daisy granny square!
Like what you learned? Pin for later!