This post may contain affiliate links. Should you make a purchase through one of these links, I may earn a small commission that supports me to keep making new content at no additional cost to you. For more info, please visit the Privacy Policy page.
Let’s learn how to make a heart granny square! The perfect quick and easy project for Valentines Day or for any other day/occasion! If you haven’t crocheted before, start with my beginner series to learn how to crochet!

What Yarn Am I Using?
I am using Lion Brand 24/7 Cotton Yarn. It is my absolute favourite go to yarn for creating just about anything!
You can purchase the ad-free printable PDF version of this pattern here!
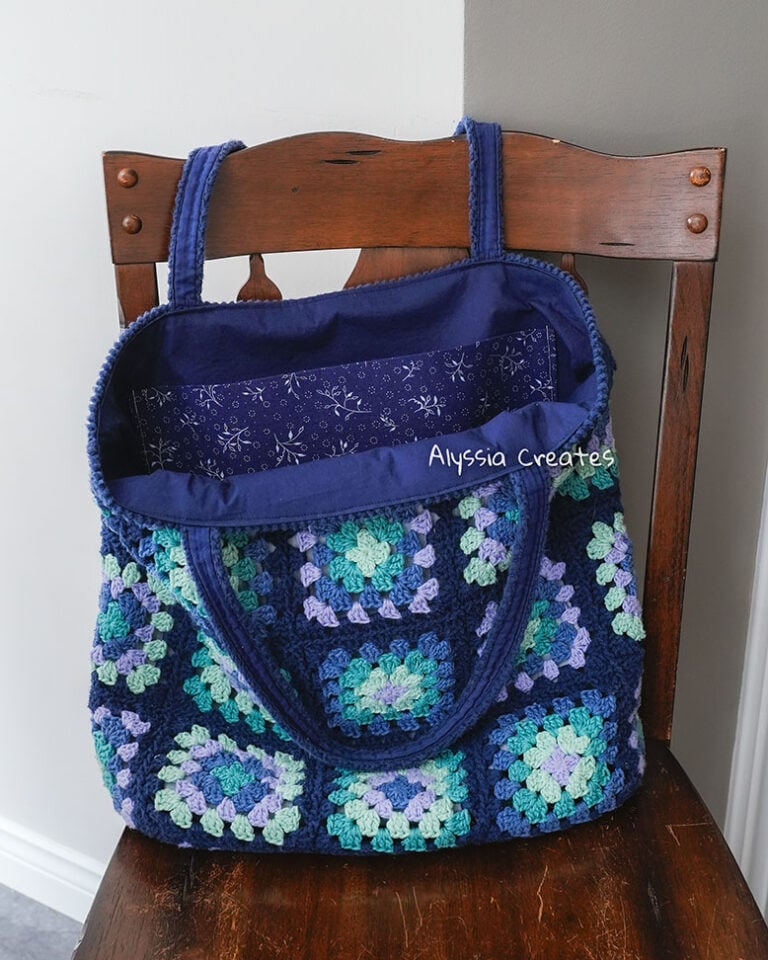
Additionally, this pattern is compatible with the majority of my other granny square/bag designs, which you can shop here!
Difficulty Level
- Advanced Beginner/Intermediate
Supply List:
Yarn/Material (for one granny square) – Lion Brand 24/7 Cotton Yarn (worsted weight level 4 yarn):
- Yarn A – Approx 3g/5.7 yds (Burgundy – Heart)
- Yarn B – Approx 7g/13.3 yds (Beechnut – Square)
- Yarn C – Approx 1g/1.9 yds (White – Heart Outline)
Hook:
Other:
Finished Measurement:
- Final heart granny square measures to about 4″ x 4″ (this can vary depending on yarn you use and or tension)
Stitches Used/Abbreviations (US Terms):
- Magic Circle
- ch = Chain
- st(s) = Stitch(es)
- sl st = Slip Stitch
- sc = Single Crochet
- hdc = Half Double Crochet
- dc = Double Crochet
- tc = Triple Crochet
- yo = Yarn Over
- FO = Fasten Off
- sk = Skip
- sp(s) = Space(s)
- Rep = Repeat
- Cont = Continue
- Beg = Beginning
- Prev = Previous
- * = Repeat Instructions
- (…) = sts within parenthesis to be worked all into the same indicated st/sp
- […] = Repeat instructions within brackets the indicated amount of times
Pattern Notes:
- This pattern is written in US terms and is worked in rounds.
- Photo steps/breakdowns are included below most rounds. Photographs are from a right handed crochet perspective.
- When viewing the diagrams, I have included parenthesis to indicate when sts are to be placed into the same st/sp.
- I would recommend to block your squares for best results 🙂
Follow along with my YouTube Tutorial!
Pattern
Visual Heart Granny Square Pattern:
Below is the pattern broken down into visual steps for those who are more visual learners. There is also just the written pattern at the end of this post for those who would prefer that 🙂
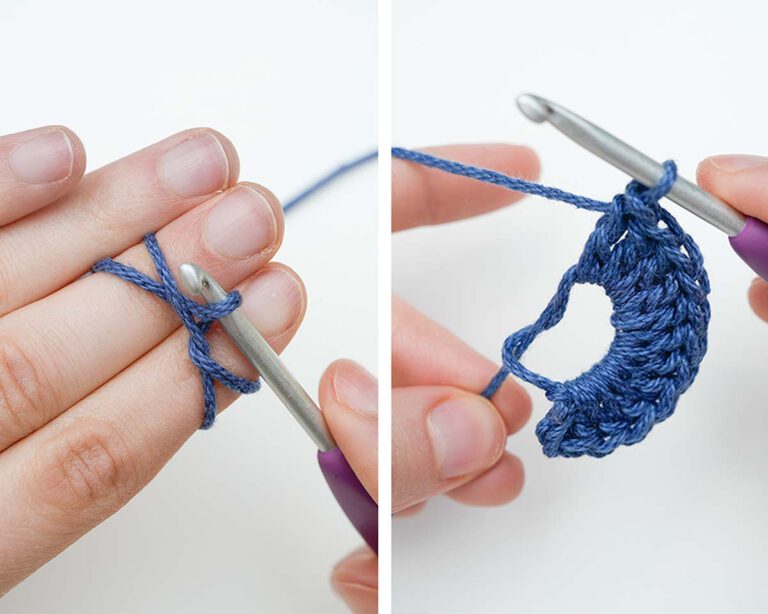
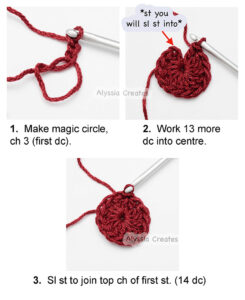
Round 1:
Starting with Yarn A and a 4mm hook, make a magic circle. Ch 3 (first dc). Work 13 more dc into the circle. Sl st into top ch of first st to join. Pull tail to close circle. Do not FO. (14 dc)
Note: Sts with the (…) are to be worked into the same st/sp.
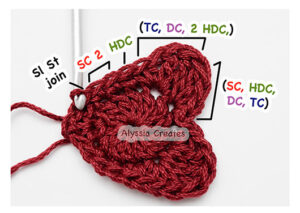
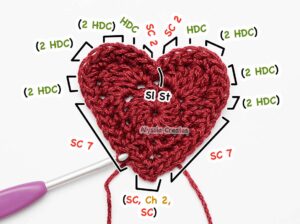
Round 2:
- Ch 1 (counts as first sc. Tip: place a st marker into this ch to mark the beg of round). Into next st, work: (sc, ch 2, sc).

- Work the following into next 6 sts: sc 3, hdc, (2 hdc, dc, tc), (tc, dc, hdc, sc).

- Sl st into next st.

- Into remaining sts, work: (sc, hdc, dc, tc), (tc, dc, 2 hdc), hdc, sc 2. Sl st to join ch 1 at beg of round. (27 sts around – not including the ch 2 at bottom of heart)
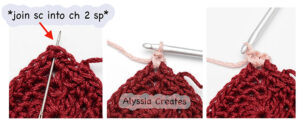
Round 3:
- Ch 1 (first sc – place st marker in this ch 1).
- Sc into the next st. Into the ch 2 sp, work: (sc, ch 2, sc).
- Sc into next 7 sts, [(2 hdc) into next st] 3 times, hdc, sc 2.
- Sl st into the same st from round 1 as you did in prev round.
- Into remaining sts, work: sc 2, hdc, [(2 hdc) into next st] 3 times, sc 5. Sl st to join the ch 1 at beg of round. FO. (35 sts around – not including the ch 2 at bottom of heart)

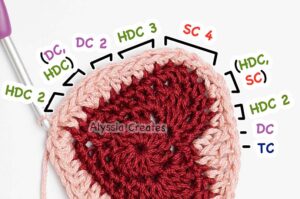
Round 4:
- With Yarn B, attach with sc into bottom ch 2 sp, place 2nd sc into same sp.
- Work the following in the next 17 sts bringing you to the indent at top of heart: hdc 2, (hdc, dc), dc 2, hdc 3, sc 4, (sc, hdc), hdc 2, dc, tc.
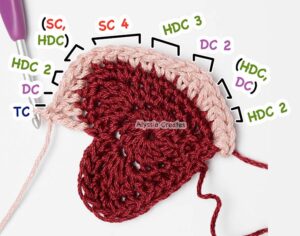
- Sk the middle sl st from prev round.
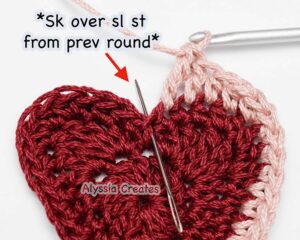
- Work the following into the remaining sts: tc, dc, hdc 2, (hdc, sc), sc 4, hdc 3, dc 2, (dc, hdc), hdc 2. Sl st to join first sc. (40 sts around)

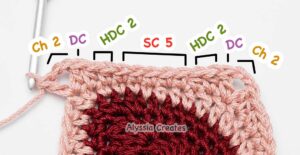
Round 5:
- Ch 1 (first sc), sc 3, hdc 2, (dc, ch 2, dc) in next st to form corner.
- [Hdc 2, sc 5, hdc 2, (dc, ch 2, dc)] 3 times.
- After last corner, hdc 2, sc 1 to finish round.
- Sl st into ch 1 to join. (11 sts on each side of square for total of 44 around – not including the corner chs)

Round 6:
Ch 3 (first dc). Dc into next 6 sts. * (2 dc, ch 2, 2 dc) in corner sp. Dc 11 across until next corner sp. Rep from * until end of round. Round should end with dc 4 after last corner is made. Sl st into top of first st to join. FO. (15 dc on each side – 60 dc around)


You can choose to be done here or continue on to the next step to add an outline to further accentuate your heart!
Heart Outline (Optional):
As an optional detail to further accentuate the heart shape, you can sl st on the surface of your square following the stitches of round 3 to outline the heart.
- Into any of the sts from round 3 along the outline of your heart, insert hook to pull up a loop of Yarn C.
- Hold end securely at back and sl st into each st of the heart (even working into the ch 2 sp at bottom of heart).
- Once you get to the indent in the middle of heart at top, work sl st into round 1 to further define the shape.
- Cont to sl st following the outline. Once at beg of round, sl st back into first st and pull loop to back to FO.

Written Heart Granny Square Pattern:
Below is strictly just the written version of this pattern without the added photo/step breakdown. If you need more clarity, see the visual pattern above.
Round 1: Starting with Yarn A and a 4mm hook, make a magic circle. Ch 3 (first dc). Work 13 more dc into the circle. Sl st into top ch of first st to join. Pull tail to close circle. Do not FO. (14 dc)
Note: Sts with the (…) are to be worked into the same st/sp.
Round 2: Ch 1 (counts as first sc. Tip: place a st marker into this ch to mark the beg of round). Into next st, work: (sc, ch 2, sc). Work the following into next 6 sts: sc 3, hdc, (2 hdc, dc, tc), (tc, dc, hdc, sc). Sl st into next st. Into remaining sts, work: (sc, hdc, dc, tc), (tc, dc, 2 hdc), hdc, sc 2. Sl st to join ch 1 at beg of round. (27 sts around – not including the ch 2 at bottom of heart)
Round 3: Ch 1 (first sc – place st marker in this ch 1). Sc into the next st. Into the ch 2 sp, work: (sc, ch 2, sc). Sc into next 7 sts, [(2 hdc) into next st] 3 times, hdc, sc 2. Sl st into the same st from round 1 as you did in prev round. Into remaining sts, work: sc 2, hdc, [(2 hdc) into next st] 3 times, sc 5. Sl st to join the ch 1 at beg of round. FO. (35 sts around – not including the ch 2 at bottom of heart)
Round 4: With Yarn B, attach with sc into bottom ch 2 sp, place 2nd sc into same sp. Work the following in the next 17 sts bringing you to the indent at top of heart: hdc 2, (hdc, dc), dc 2, hdc 3, sc 4, (sc, hdc), hdc 2, dc, tc. Sk the middle sl st from prev round and work the following into the remaining sts: tc, dc, hdc 2, (hdc, sc), sc 4, hdc 3, dc 2, (dc, hdc), hdc 2. Sl st to join first sc. (40 sts around)
Round 5: Ch 1 (first sc), sc 3, hdc 2, (dc, ch 2, dc) in next st to form corner. [Hdc 2, sc 5, hdc 2, (dc, ch 2, dc)] 3 times. After last corner, hdc 2, sc 1 to finish round. Sl st into ch 1 to join. (11 sts on each side of square for total of 44 around – not including the corner chs)
Round 6: Ch 3 (first dc). Dc into next 6 sts. * (2 dc, ch 2, 2 dc) in corner sp. Dc 11 across until next corner sp. Rep from * until end of round. Round should end with dc 4 after last corner is made. Sl st into top of first st to join. FO. (15 dc on each side – 60 dc around)
Heart Outline (Optional): As an optional detail to further accentuate the heart shape, you can sl st on the surface of your square following the stitches of round 3 to outline the heart:
Into any of the sts from round 3 along the outline of your heart, insert hook to pull up a loop of Yarn C. Hold end securely at back and sl st into each st of the heart (even working into the ch 2 sp at bottom of heart). Once you get to the indent in the middle of heart at top, work sl st into round 1 to further define the shape. Cont to sl st following the outline. Once at beg of round, sl st back into first st and pull loop to back to FO.
All Done!
I hope you enjoyed creating this granny square – I would absolutely love to see the results! Please link to my website alyssiacreates.com and tag me @alyssia.creates on Instagram or Tiktok if you post your projects featuring this granny square!
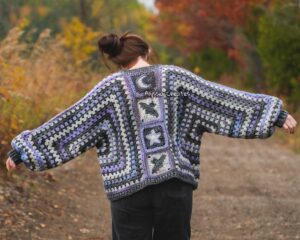
What’s next?
Use this granny square as part of the back panel in my hexagon cardigan pattern!
Like what you learned? Pin for later!