This post may contain affiliate links. Should you make a purchase through one of these links, I may earn a small commission that supports me to keep making new content at no additional cost to you. For more info, please visit the Privacy Policy page.
Interfacing is very helpful when looking to add more structure to your sewing projects – I do a lot of bag making so it has become a very necessary step in doing so. In this post, I will go over the basics of how to easily apply iron-on fusible interfacing to fabric.
What you will need
- 100% Cotton Fabric (solid colours) , 100% Cotton Fabric (Cute Prints) – How much you need will depend on the size of your project
- light-weight or mid-weight non-woven Iron-on fusible interfacing (I used Pellon 911FF Featherweight)
- Pressing cloth (optional)
- Iron
- Tape measure
- Scissors
- Sewing pins (optional)
- Pencil
Before beginning to fuse the interfacing to your project, I highly recommend you follow these steps with a test fabric piece to ensure you are fully comfortable with the process and that your interfacing in compatible with your fabric. For the purposes of this demonstration, I am using a rectangular piece of fabric to fuse interfacing to (the same instructions will apply for differing shapes of fabric). So with that out of the way, let’s get into it!
Adding Iron-fusible interfacing to Fabric
Step 1:
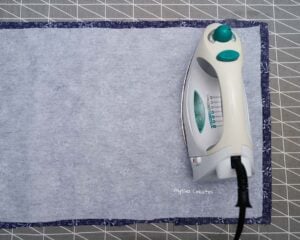
Iron your fabric. Make sure there are no wrinkles within your fabric as adding the interfacing will accentuate any wrinkle.
Step 2:
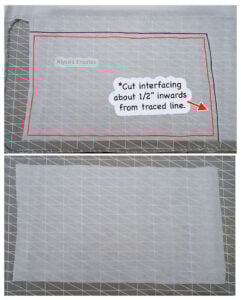
Lay your fabric piece on top of the interfacing. Trace around fabric onto the interfacing (if it’s easier, pin fabric to the interfacing so it doesn’t move).

Step 3:
Remove fabric from interfacing and then cut interfacing out about 1/4″ – 1/2” inwards from that traced line so the interfacing is slightly smaller than the fabric piece (this helps avoid any gluey mess when fusing. It also makes it easier to fold over fabric edges if needed).
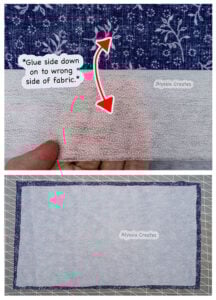
Step 4:
With wrong side of fabric facing up, place interfacing glue side down on to the wrong side of fabric (generally speaking, this will be the side with the glue dots, however refer to the instructions on the interfacing that you are using as a guideline). There should be about a 1/4″ – 1/2” of fabric around the edge of the interfacing.
Step 5:
Before fusing interfacing to fabric, it can be helpful to place a dampened pressing cloth on top of interfacing and fabric (I personally don’t do this). Set iron temperature to wool/steam setting. Start to press with iron to tack interfacing to fabric. Do not use side to side motion, only press up and down. Repeat pressing and holding until interfacing is fused to the fabric (about 10-15 seconds each press, sometimes longer). Flip fabric to right side and steam press. Let cool and check to make sure it’s bonded.
And that’s it!
All Done!
If you are following along with my how to line a crochet bag post and you are reading this post to add interfacing to your lining, click here to return to that post!
Like what you learned? Pin for later!