This post may contain affiliate links. Should you make a purchase through one of these links, I may earn a small commission that supports me to keep making new content at no additional cost to you. For more info, please visit the Privacy Policy page.
Let’s learn how to make a crochet sunflower strap! Whether you want to use the strap for a bag or if you are a photographer, and want a new camera strap; instructions for both options are included in this pattern!


Please note: This pattern is copyright of Alyssia Stacey-Orchard of Alyssia Creates. DO NOT claim this design as your own or make patterns/video tutorials based on or inspired by this design.
What Yarn Am I Using?
I am using DMC embroidery floss (alternative embroidery floss multi colour pack). I have also used Aunt Lydias crochet thread which also works great for this project! I just like all the colour options available in the embroidery floss.
Difficulty Level
- Intermediate
Supply List:
Embroidery Thread/Floss: DMC embroidery floss (8.7yds each skein)
- Floss A – Approx. 1- 2 skeins (839 Dark Beige Brown – centre of sunflower)
- Floss B – Approx. 3-4 skeins (3852 Very Dark Straw – inner petals)
- Floss C – Approx. 4-5 skeins (3822 Light Straw – Outer petals)
- Floss D – Approx. 4-5 skeins (26 Medium Light Eggplant – Inner Square)
- Floss E – Approx. 8-9 skeins (29 Eggplant – Main Background)
Metallic Sewing Thread: Mutli colour pack of metallic thread
Here are some alternative embroidery floss/crochet thread:
- Aunt Lydia’s Crochet Thread (Size 10)
- Embroidery Floss (multi-colour pack)
- Hobbii Embroidery Floss
- Caydo 50 Skeins Embroidery Thread
Hook:
Other Accessories/Materials:
Needed for Both Strap Options:
- Iron for fabric lining
- Iron-on fusible interfacing
- Gutermann Thread / Caydo Sewing/Embroidery Thread
- 100% Cotton Fabric (solid colours)
- 100% Cotton Fabric (Cute Prints)
Needed for Bag Strap Option Only:
Needed for Camera Strap Option Only:
- Quick Release Connectors
- 3/8″ Sliders x 2
- 3/8” Wide Nylon Webbing (cut to size – I use approx. 10”-12” for each side of strap)
- lighter (to melt webbing ends to stop fraying)
Tools/Notions:
- Tapestry needle
- Tape measure
- Sewing pins
- Stitch marker(s)
- Scissors
- Sewing needle or Sewing machine / Caydo 2-in-1 Sewing & Embroidery Machine (depending on chosen way to attach lining)
- Pencil
Finished Measurement:
GAUGE:
- Each mini granny square is approx. 2” x 2”
STRAP DIMENSIONS:
- Bag Strap – Approx. Length: 33″ (with swivel clasps) x Width: 2.25”
- Camera/Binocular Strap – Crochet strap part is approx. Length: 31” x Width: 2.25” (length is adjustable with the webbing)
Stitches Used/Abbreviations (US Terms):
- Magic Circle
- ch = Chain
- st(s) = Stitch(es)
- sl st = Slip Stitch
- sc = Single Crochet
- hdc = Half Double Crochet
- dc = Double Crochet
- sc2tog = Single Crochet 2 Together (to decrease)
- ps = Puff Stitch
- bo = Bobble Stich
- yo = Yarn Over
- FO = Fasten off
- sk = Skip
- sp(s) = Space(s)
- Approx. = Approximately
- Rep = Repeat
- Cont = Continue
- Beg = Beginning
- Bl(o) = Back loop (only)
- * = Repeat Instructions
- (…) = sts within parenthesis to be worked all into the same indicated st/sp
Pattern Notes:
- Pattern is arranged into 3 main sections; Sunflower Granny Square, Attaching Strap Together, and Fabric Lining.
- There are two strap attachment options available so that you can either use your strap more traditionally with a bag, or so it can specifically be used for a camera/binoculars. Both methods will be shown.
- Photo steps/breakdowns are included below most rounds. Photographs are from a right handed crochet perspective.
- Both strap options are comprised of 14 granny squares (quantity can easily be adjusted to preference)
- There is a fabric lining/sewing section which will be shown with the use of a sewing machine – but it can be hand sewn as well. Fabric lining as a whole is entirely optional but I highly recommend it in order to maintain the structure of your strap.
- To make the strap sparkly, I crochet metallic thread in with the embroidery floss while making certain parts.
- Please note that working with the thinner thread + smaller hook if you haven’t done so before can certainly pose its challenges and take some getting use to!
If you are interested, follow along with my crochet along style video creating this exact same strap! This video also features some of my photography but the primary focus is a tutorial for the strap 🙂
Section 1: Sunflower Granny Square
Round 1:
Using Thread A and a 2.25mm crochet hook, make magic circle. Ch 2, work 12 hdc into the centre of the circle. Sl st into first hdc to join (skipping over the ch 2 from beg of round). Pull tail to close circle. FO. (12 hdc)

Round 2:
Attach Thread B to any st. Ch 2 and work a ps into same st as just attached, ch 1 to lock into place. (ps, ch 1) in each hdc st until end of round, sl st into top of first ps. FO. (12 ps)

Round 3:
Attach Thread C to any ch 1 sp. Ch 2, work a bo st into same sp, ch 2. (bo, ch 2) in each ch 1 sp until end of round, sl st into top of first bo st. FO. (12 bo)

Round 4:
Attach Thread D with metallic thread into any sp around, ch 2 (first hdc). 2 more hdc into that sp. * In next sp, (3 dc, ch 2, 3 dc) to form corner. In next sp, 3 hdc, 3 more hdc in next sp. Rep from * until end of round. Sl st into top of first st to join. (12 sts on each side of square for total of 48 sts around – not including corner chs)

Round 5:
Attach Thread E with a sc into any of the corner sps. Work a 2nd sc into same sp. *Sc 12 across until next corner sp. (2 sc, ch 2, 2 sc) in next sp to form corner. Rep from * until back to first space. To finish round, work (2 sc, ch 2) back into first sp and sl st to join first sc. FO (16 sc across each side)

Repeat rounds 1-5 thirteen more times for 14 squares (or adjust the quantity to your preference)!

Section 2: Attaching Strap Together – Slip Stitch Join
I will be showcasing the slip stitch join method of attaching squares. However, feel free to attach in a different way if you prefer an alternative method. After seaming the strap together, there are two options for the attachment style of the strap – option 1 will be for a traditional bag strap with swivel clasps to attach (how to add the clasps will be shown in this section) and option 2 will be for a camera strap that will use webbing and sliders/quick release clips to attach (these extra pieces will be added when assembling the fabric lining in section 3). Both options will start off being worked the same in this section until indicated otherwise.
Assembling Strap:
Note: Make sure your tension isn’t too tight for the sl st join. You may need to use a looser tension or even size up your hook to ensure the squares lay nicely.
Step 1:
- With the squares laid out, start at either end of the strap to begin attaching the first set of squares next to each other. In the corners that align next to each other, insert hook into blo of the 2nd ch of both squares. Pull up a loop of the embroidery floss that was used for the border round of the squares.

- Sl st into blo of the next st of both squares.

- Cont to sl st into blo of each corresponding st until corner.

- Once at corner, sl st into bl of first ch only. FO.

Step 2:
- Rep step 1 process until all squares have been attached. Adjust length to preference; it might be helpful to measure against yourself to get an idea of a good length for you. Remember to keep in mind the additional length the swivel clasps or webbing (depending on the strap you are making) will add! With that said, at this point all my squares connected measure to about 28”-29”. The total bag strap with the swivel clasps will be about 33” and then the camera strap will have an adjustable length with the webbing added (I usually add about 10”-12” of webbing on each side).

Step 3:
Once all the squares are attached, I like to add a round of sc around the entirety of the strap. See instructions below:
- With strap laying horizontal, attach with a sc into the farthest top right corner of side (left if left handed).
- * Sc into the next 16 sts of square. Sc into the corner sp, the seam, and then into corner sp of next square. Rep from * until farthest corner on other side.
- Once at corner on opposite side, (sc, ch 2, sc) into corner sp
- Sc 16 along the width. (sc, ch 2, sc) into corner sp.
- Sc across until corner sp on other end. (Sc, ch 2, sc) in corner, sc 16. Sc into first corner sp, ch 2 and sl st to join first sc. Do not FO.

Step 4:
Optional (sl stitching around strap to reduce stretching if not adding fabric lining): From where you left off in prev round, sl st across into each st going around your entire strap. Keep sl st tension consistent with width of each st (you may need to size up your hook if tension becomes too tight). Once at beg again, FO. Weave in ends. If you are adding a lining (which I HIGHLY recommend), you can skip this step.
Adding Rows on Strap Ends to Decrease Width:
Row 1:
Starting at either side of strap (with strap laying vertical), join with a sc into the right side corner (left if left handed). Sc 18 across, sc into corner sp. (20 sc)
Row 2:
Turn work, ch 1, sc2tog to decrease, sc 16, sc2tog (18)
Row 3:
Turn work, ch 1, sc2tog, sc 14, sc2tog (16)
**Important Note**: At this point, you have 2 options for how you want to proceed with your strap (continuing from row 4 without fastening off). Are you making this strap for a bag OR are you going to primarily use it as a camera/binocular strap? If you are just wanting a traditional strap with a regular clasp to attach, cont to option 1 below. If you are making this as a camera strap, cont to option 2 further down.

Option 1 – Bag Strap
Row 4 – 7:
Turn work, ch 1, sc across (16)

Attaching 1.5” Width Swivel Clasps:
Note: If using swivel clasps with different width, you may need to add additional decreases to the ends of your strap before beginning to attach.
Follow steps below:
Step 1:
Remove loop off hook and pull loop big so it doesn’t come undone (if it’s easier, you can FO and then re-attach thread in step 3). Weave strap end through swivel clasp as pictured below.

Step 2:
Flip strap over to wrong side and fold end over the base of the swivel clasp. Put loop back on hook. I find it helpful to use a stitch marker to hold the piece in place on opposite side from hook.

Step 3:
Sl st across going through the overlapping layers beneath the base of the swivel clasp (row 6 and then through row 2 on other side).

Step 4:
Once across, turn and sl st back down to other side again for extra security (working through row 7 and row 1 this time). Once at start again, sl st into starting point. FO.
Rep process on other side of strap. Then continue to section 4 to add the fabric lining.

Option 2 – Camera/Binocular Strap
Row 4:
Turn work, ch 1, sc2tog, sc 12, sc2tog. (14)
Row 5:
Turn work, ch 1, sc2tog, sc 10, sc2tog. (12)
Row 6:
Turn work, ch 1, sc2tog, sc 8, sc2tog. (10)
Row 7:
Turn work, ch 1, sc2tog, sc 6, sc2tog. (8)
Row 8:
Turn work, ch 1, sc2tog, sc 4, sc2tog. (6)
Row 9:
Turn work, ch 1, sc2tog, sc 2, sc2tog. FO (4)

Section 3: Fabric Lining
In this section, I will show how to line the strap with fabric. I use a sewing machine for this process but if you don’t have access to one and or if easier, it can be hand sewn. I use a stitch length and tension of 3 on my sewing machine. Note: For those with little to no sewing experience, I would recommend to hand sew. Use a running stitch, back stitch or an invisible stitch to attach the lining.
Step 1:
Lay strap on your fabric about 1/2” away from the edge of your fabric. Trace around strap leaving 1/2” of an allowance (only tracing around the crochet part, not the swivel clasps if those were added in last section).

Step 2:
Cut fabric out (you can use shears to reduce fraying). Iron fabric.
Note: Steps 3-6 will showcase how to add interfacing to your fabric lining. This is an optional addition if you would like to add more structure to your lining. If you don’t want to add the interfacing, skip to step 7. If adding the interfacing, I highly recommend to do a test fabric piece with the interfacing before adding it to your strap lining. Make sure there are no wrinkles within your fabric as adding the interfacing will accentuate any wrinkle.
Step 3:
Lay out your fabric piece on top of the interfacing. Trace around fabric on to the interfacing (if it’s easier, pin fabric to the interfacing so it doesn’t move).

Step 4:
Remove fabric from interfacing and then cut interfacing out about 1/2” inwards from that traced line so the interfacing is slightly smaller than the fabric piece (this helps avoid any gluey mess when fusing. It also makes it easier to fold over the fabric edges where needed).

Step 5:
With the wrong side of the fabric facing up, place interfacing glue side down on to the wrong side of fabric (generally speaking, this will be the side with the glue dots, however refer to the instructions on the interfacing that you are using as a guideline). There should be about a 1/2” of fabric around the edge of the interfacing.

Step 6:
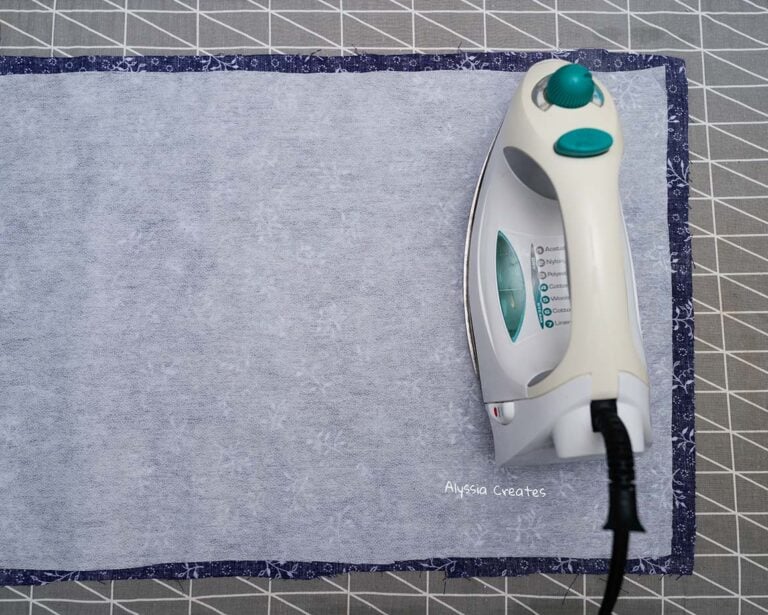
Before fusing interfacing to fabric, it can be helpful to place a thin dampened pressing cloth on top of interfacing and fabric (I personally don’t do this). With that said, start to press with iron to tack interfacing to fabric. Do not use side to side motion, only press up and down. Repeat pressing and holding until interfacing is fused to the fabric (about 10-15 seconds each press, sometimes longer). Let cool and check to make sure it’s bonded before continuing.

Step 7:
Fold all the edges of the fabric about 1/2” inwards to the wrong side of the fabric and iron it into place. With the edges folded in, the fabric should match the approximate length and width of your strap, adjust as needed.

**Note**: the remaining steps change a bit depending on the strap option you are making. If you are making the traditional bag strap, cont to option 1 below. If you are making the camera strap, cont to option 2 further down.
Option 1 – Bag Strap
Step 8:
Put the wrong side of the fabric facing the wrong side of the strap and pin into place (right sides facing outwards). Make sure to align the fabric underneath the swivel clasps so you can sew to the crochet part. I like to adjust these sides a bit so the fabric follows the shape of the strap as opposed to being completely squared.

Step 9:
Sew following the pins around to attach fabric to strap (if using sewing machine, place crochet part facing downwards). If hand sewing, use a running, back, or invisible stitch. And that’s it for this option – All Done!

Option 1 – Camera/Binocular Strap
Step 8:
Cut 2 (approx. 10”-12” in length) pieces of 3/8” wide nylon webbing. With a lighter, carefully melt the ends to reduce fraying.

Step 9:
With the wrong side of your strap facing upwards, place the webbing pieces on top of each end of the strap about 1” inwards.

Step 10:
Put the wrong side of the fabric facing the wrong side of the strap. The webbing ends should be sandwiched between the strap and the lining. Pin into place (right sides facing outwards).

Step 11:
Sew following the pins around to attach fabric to strap (if using sewing machine, place crochet part facing downwards). If hand sewing use a running, back, or invisible stitch.

Step 12:
As an optional step to add more structure once the lining has been attached, I like to sew a little rectangle over where that inch of webbing is sandwiched in at the end of each strap. You can additionally sew another line across at the base of the triangle before the first/last granny square begins (as pictured in first photo below).

Adding the Slider + Quick Release Clips to the Webbing
The below steps will showcase how to add the extra pieces to your camera strap.
Step 1:
With the strap facing crochet side up, weave the slider piece onto the webbing (webbing should be weaved over the middle part of slider – so weave end up through from the bottom side opening to then exit the other opening). Placement of slider can vary depending on the length you want your strap.

Step 2:
Weave the quick release clips on if you have them (loop side of the clip should be facing downwards as pictured below). Once the quick release clips are attached, you’ll need to unbuckle the bottom part to loop through your camera to then re-buckle the piece together. If you don’t have the clips, weave the webbing through your camera 🙂

Step 3:
Fold the end upwards to weave back through the slider going towards the strap (creating a loop at the bottom that holds the quick release clips OR where you would loop to attach your camera if you don’t have the quick release clips).

Step 4:
If you have excess webbing from adjusting strap to preferred length, fold the end downwards to then weave back through the slider again going towards the bottom without weaving all the way through (this will create a little loop at the top).

All done!
I hope that you enjoyed making this strap – I would absolutely love to see the results 🙂 Please link to my website alyssiacreates.com and tag me @alyssia.creates on Instagram or Tiktok if you post your strap!
Thank you so much for your interest in this design!
Like what you learned? Pin for later!

What’s next?
Pair this strap with my Sunflower Bookmark Pattern!