This post may contain affiliate links. Should you make a purchase through one of these links, I may earn a small commission that supports me to keep making new content at no additional cost to you. For more info, please visit the Privacy Policy page.
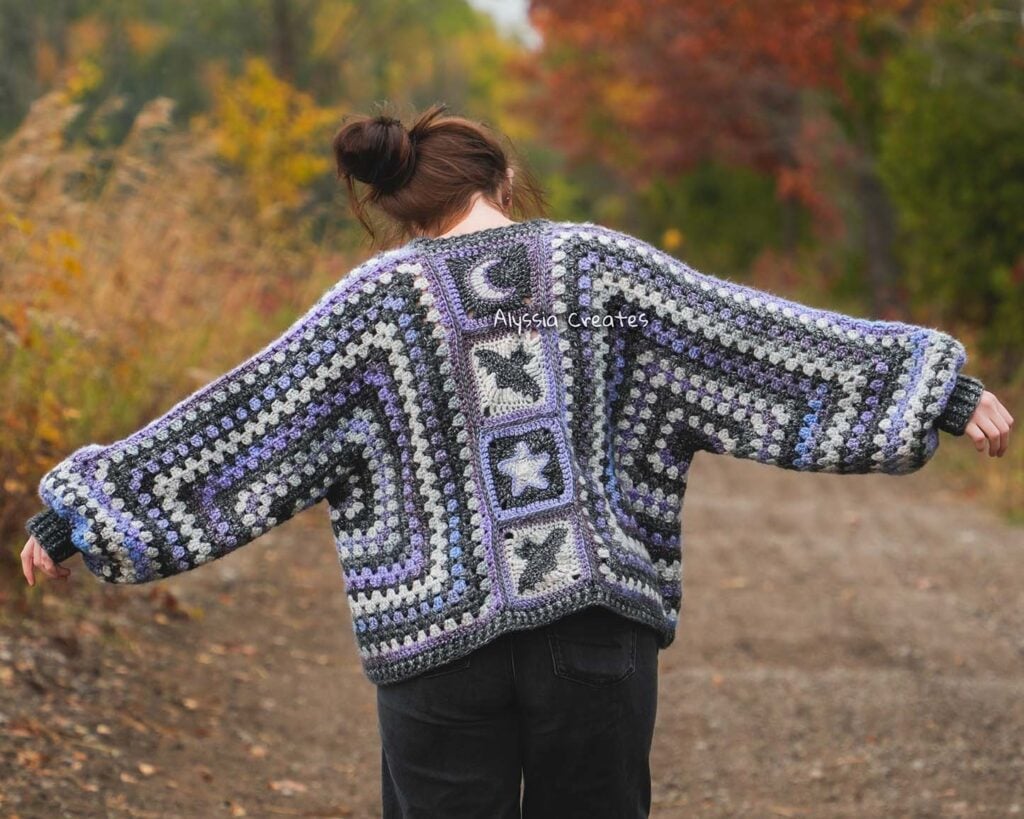
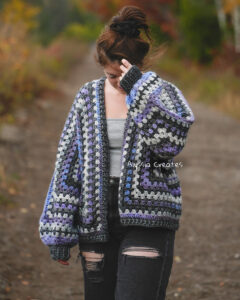
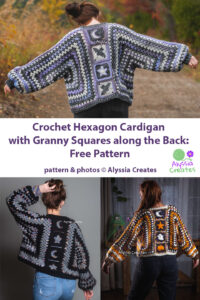
Learn to make a crochet hexagon cardigan with detailed instructions for each step including how to add your choice of granny square(s) along the backside! If you haven’t crocheted before, start with my beginner series to learn how to crochet!
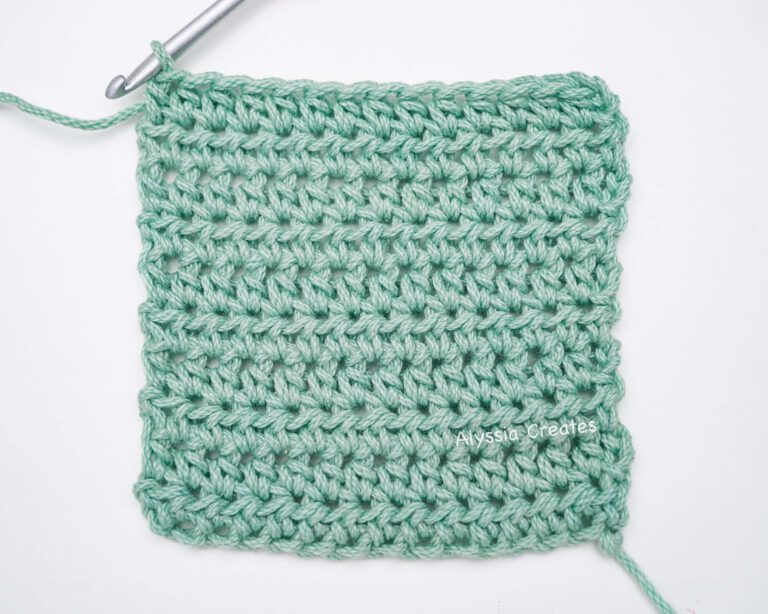
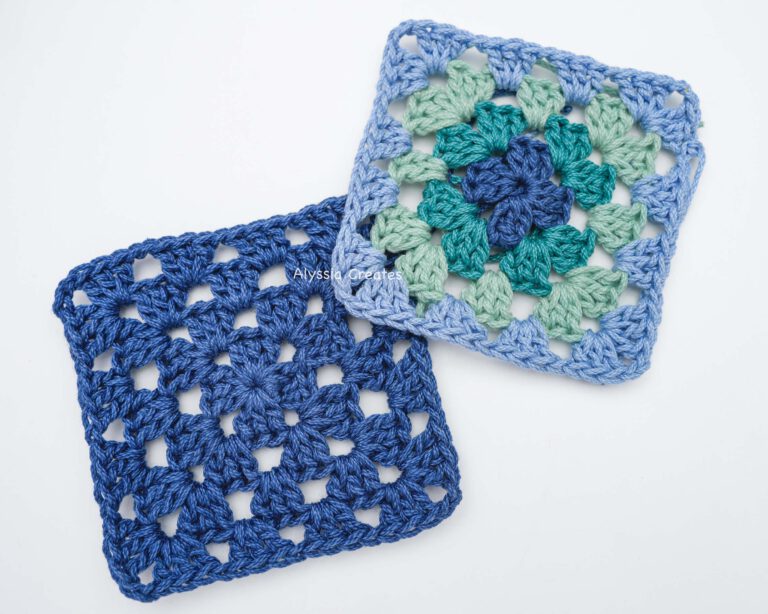
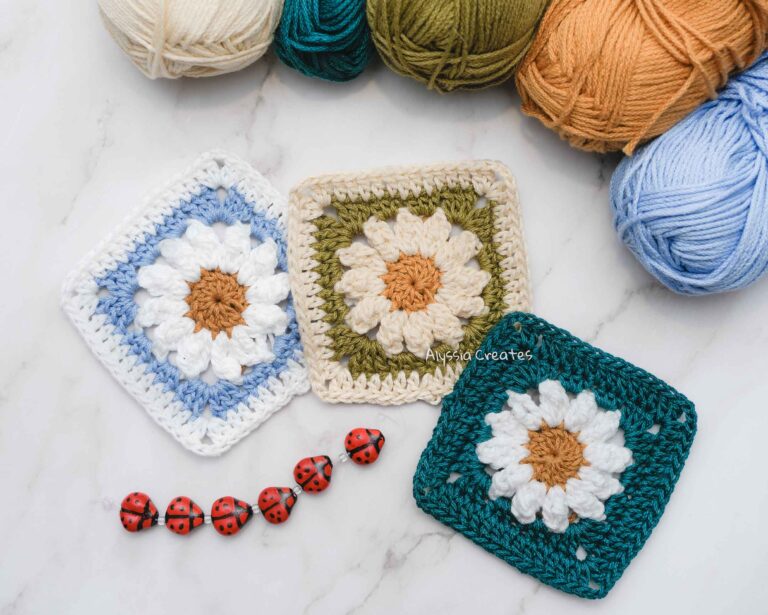
This crochet hexagon cardigan is compatible to include in projects with the solid granny square free pattern (up until round 4), sunflower granny square, daisy granny square, heart granny square and also my growing collection of granny square designs (in my pattern shop)!
What Yarn Am I Using?
I am using Caron Blossom Cakes! This is a medium weight cotton acrylic blend with a beautiful selection of colours (also very soft which is a huge plus)! Perfect for this project!
Difficulty Level
- Easy/Advanced Beginner
Supply List
Yarn/Material – Caron Blossom Cakes (medium weight level 4 yarn):
- Yarn A – Shadow (approx. 354g/743 yds for medium size)
- Yarn B – Pansy (approx. 206g/432 yds for medium size)
- Yarn C – Charcoal (approx. 192g/403 yds for medium size)
Hook:
Other:
- Scissors
- Tapestry needle (to weave in ends)
- Tape measure
Pattern Notes
- This pattern is written in US terms
- Pattern is arranged into 5 sections: Building the Hexagon, Sleeves, Attaching Backside Granny Squares into Panel, Attaching Cardigan Together, Ribbing
- This pattern can easily be customized into different sizes (by adding more rounds or doing less rounds) which I will explain more in relevant sections.
- You can use any granny squares along the back. I am using granny squares with a stitch count of 15 dc along each side (17 sts including the corner chs). If using a different stitch count, you may need to improvise a bit for the alignment of stitches when attaching the granny squares to your cardigan halves. If adding more/less rounds, you can include more/or less granny squares along the back which I will give general tips and instructions on how to do so for those changing stitch counts.
- This demonstration is from a right handed crochet perspective (still compatible for left handed crocheters!)
- Photo steps with breakdowns are included below text instructions for those who are more visual learners.
- The hexagon will appear crinkled as it grows and not lay completely flat (this is normal).
- This pattern does not turn after each round (unless indicated)
- I am using 3 colours for this project and like to switch my colours randomly throughout. Colour order can be changed to your preference but I will indicate whenever I change my colours!
- I change my colours by pulling a loop of next colour through loop on hook (like a ch). I do not fasten off the colours that are not in use. I carry the other colours up at the start of each round by crocheting over the working ends. This avoids having to weave in a bunch of ends – I will explain how I do this but if it’s easier you can fasten off for each colour change.
Stitches Used/Abbreviations (US Terms)
- Magic Circle
- ch = Chain
- st(s) = Stitch(es)
- sl st = Slip Stitch
- dc = Double Crochet
- fpdc = Front Post Double Crochet
- bpdc = Back Post Double Crochet
- yo = Yarn Over
- FO = Fasten off
- sp(s) = Space(s)
- Rep = Repeat
- Cont = Continue
- Prev = Previous
- Working yarn = the strand that is still connected to the yarn ball/skein
- Yarn end/tail = the end of the yarn
- * = Repeat Instructions
- (…) = sts within parenthesis to be worked all into the same indicated st/sp
Special Stitches
- fpdc = Front Post Double Crochet – Instead of working into the top of stitch, work a dc going around the post by inserting hook through from the front.
- bpdc = Back Post Double Crochet – Instead of working into the top of stitch, work a dc going around the post by inserting hook through from the back.
Gauge
- Granny Squares are approx. 5″ x 5″
- Half the hexagon at round 8 is approx. 4”
- One side of hexagon at round 8 is approx 7.6”
Dimensions/Sizes
Note: The size of this crochet hexagon cardigan is determined by the amount of granny squares used along the back and the dimensions of said granny squares. With those granny squares attached – I then create as many rounds that will fit the dimensions while also having a comparable stitch count to make attaching the pieces together easily. With that said, this pattern isn’t really written as a typical small, medium, large etc. I have given 3 different examples using either 3, 4 or 5 granny squares along the back (5″ x 5″ granny squares). You can follow along with my stitch counts or you can use this as a guideline to help determine how to make your perfect cardigan. You can also play around with hook sizes and yarn weight to be able to create a plethora of different sizes; I am using a medium weight yarn with a 6mm crochet hook which I feel is the perfect sweet spot for this project.
Approx. Dimensions (for hexagon cardigan with 3 granny squares along the back):
- Length from shoulder to bottom ribbing: 17.5″
- Width of one half of Hexagon: 7.5″
- Width across backside with granny squares: 20″
- Sleeve from armpit of cardigan to cuffs: 17.5″ (adjust sleeve length to preference as per instructions)
- Sleeve from neckline ribbing to sleeve cuffs: 24.5″ (adjust sleeve length to preference as per instructions)
Approx. Dimensions (for hexagon cardigan with 4 granny squares along the back):
- Length from shoulder to bottom ribbing: 23″
- Width of one half of Hexagon: 10.5″
- Width across backside with granny squares: 26″
- Sleeve from armpit of cardigan to cuffs: 17.5″ (adjust sleeve length to preference as per instructions)
- Sleeve from neckline ribbing to sleeve cuffs: 27.5″ (adjust sleeve length to preference as per instructions)
Approx. Dimensions (for hexagon cardigan with 5 granny squares along the back):
- Length from shoulder to bottom ribbing: 28.5″
- Width of one half of Hexagon: 13.5″
- Width across backside with granny squares: 32″
- Sleeve from neckline ribbing to sleeve cuffs: 17.5″ (adjust sleeve length to preference as per instructions)
- Sleeve from neckline ribbing to sleeve cuffs: 30.5″ (adjust sleeve length to preference as per instructions)
Note: The sizing is very customizable and can be adjusted as needed as mentioned in the pattern notes.
Granny Squares Details
For this cardigan, you can use any granny squares along the back. However to follow along seamlessly with the stitch counts that I have calculated for, I am using granny squares with a stitch count of 15 dc along each side + 2 for the corner chs (17 sts along each side all together).
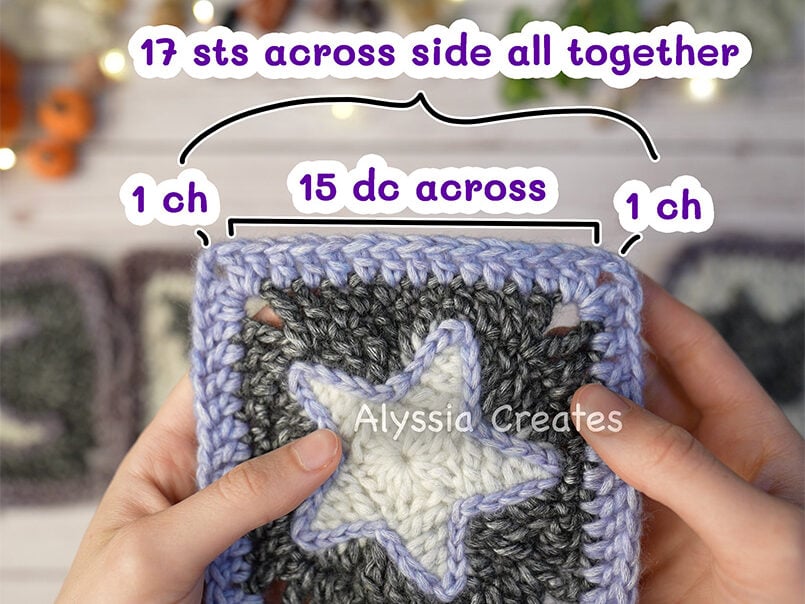
If using a different stitch count, you may need to improvise a bit for the alignment of stitches when attaching the granny squares to your cardigan pieces. If adding more/less rounds, you can include more/or less granny squares along the back which I will give general tips and instructions on how to do so for those changing stitch counts.
You can purchase my ad-free printable granny square patterns that can be used with this hexagon cardigan here! (or check out my Whimsical Granny Square Pattern Pack containing 15 compatible squares!)
Or visit the following FREE posts for compatible granny square patterns: solid granny square free pattern (up until round 4), sunflower granny square, daisy granny square, heart granny square
Follow along with my YouTube Tutorial!
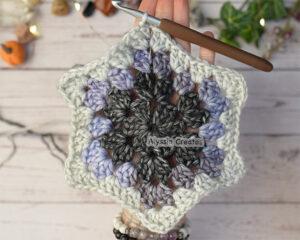
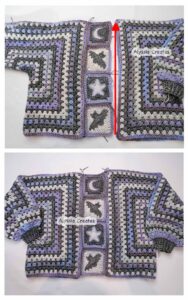
Section 1: Building the Hexagon
In this section, I will demonstrate how to create the 2 hexagon pieces for the body of your cardigan. There will be 6 sides with each side increasing by 3 dc each round. I change the colours randomly throughout and will note when I make these colour changes so you can create it the exact same (or you can change it up to your preference)! I do not fasten off the colours that are not in use; I carry the colours up at the start of each round by crocheting over the working ends within the first space only. This avoids having to weave in a bunch of ends, however you can fasten off for each colour change if that is easier for you!
Note: If making a crochet hexagon cardigan with 3 granny squares along the back, work up until round 15 (or 16). If doing 4 granny squares along the back as I am, this will bring us to 21 rounds (or you can do 22). If doing 5 granny squares along the back, you will need to work 6 additional rounds for 27 rounds (or 28). Generally speaking, with each granny square added (with a stitch count of 15 + 2 for corner chs), the amount of needed rounds will increase/decrease by about 6 to have comparable stitch counts when attaching. With that said, if you are using granny squares with a different stitch count than indicated – this will likely be different and the amount of rounds may need to be adjusted!
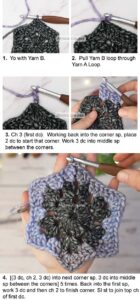
Round 1:
- With Yarn A, make a magic circle (or alternatively Ch 5 and sl st into the first ch to join)
- Ch 3 (which will count as your first dc).
- Then work 2 dc into the centre of the circle. Ch 2 to start first corner.
- [3 dc back into centre, ch 2] 5 times
- Sl st to join top ch of first st. Do not Fasten off. (6 sides all together with 3 dc across each side).

Round 2:
- Working another round with Yarn A, ch 3 (counts as first dc).
- Working back into the corner sp, place 2 dc to start that corner (corner finished at end of round).
- [(3 dc, ch 2, 3 dc) into next corner sp] 5 times.
- Into the first sp where you started the round, work 3 dc. Ch 2 and sl st to join top ch of first dc to finish the corner for this round. (6 sides all together with 6 dc across each side)
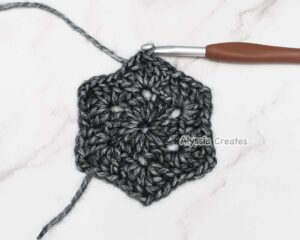
Round 3:
- Placing Yarn A aside (do not FO), yarn over with Yarn B to change colour, ch 3 (counts as first dc).
- Working back into the corner sp, place 2 dc to start that corner.
- Work 3 dc into middle sp between the corners.
- [(3 dc, ch 2, 3 dc) into next corner sp, 3 dc into middle sp between the corners] 5 times.
- Into the first sp where you started the round, work 3 dc. Ch 2 and sl st to join top ch of first dc to finish the corner for this round. (6 sides all together with 9 dc across each side)
Round 4:
- Placing Yarn B aside without fastening off, yarn over with Yarn C to change colour, ch 3 (counts as first dc).
- Working into the corner sp with Yarn C, carry Yarn A + B up within the back of your work to then place 2 dc over those working yarns within that first space (so all 3 yarn colours are moving upwards with each round created).
- Work 3 dc into the next 2 sps.
- [(3 dc, ch 2, 3 dc) into next corner sp, 3 dc into next 2 sps between the corners] 5 times.
- Into the first sp where you started the round, work 3 dc. Ch 2 and sl st to join top ch of first dc to finish the corner for this round. (6 sides all together with 12 dc across each side)
Note:
The process onwards will basically be the same as round 4. Upon completing each round, you will gain an additional space in between the corners of each side of the hexagon. So, you can continue to make the hexagon as large as you want by repeating the same process as round 4 but adding an additional (3 dc) into the new spaces made in between the corners of each round. In other words, you would continue to work (3 dc, ch 2, 3 dc) into the corner spaces and then (3 dc) into each space in-between the corners.
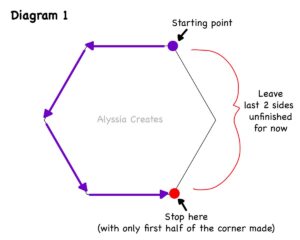
For this pattern to have 4 granny squares along the back; I will be making 21 complete rounds and then will start round 22 with only creating the first 4 sides (leaving the last 2 sides unfinished to begin the sleeve). If you would like only 3 granny squares along the back; make 15 complete rounds with the 16th round being the round to start the sleeve. If you would like to add 5 squares; make 27 complete rounds with the 28th round being the round to start the sleeve.
Continue below for the complete instructions of each round including colour changes.
Round 5:
Carry Yarn A upwards to yo and change colour, ch 3 (counts as first dc). Working back into the corner sp, place 2 dc over Yarn B + C to carry yarn upward. Work 3 dc into the next 3 sps. [(3 dc, ch 2, 3 dc) into next corner sp, 3 dc into next 3 sps between the corners] 5 times. Into the first sp where you started the round, work 3 dc. Ch 2 and sl st to join top ch of first dc to finish the corner for this round. (6 sides all together with 15 dc across each side)
Round 6:
Ch 3 with Yarn A again (counts as first dc). Working back into the corner sp, place 2 dc going over Yarn B + C. Work 3 dc into the next 4 sps. [(3 dc, ch 2, 3 dc) into next corner sp, 3 dc into next 4 sps between the corners] 5 times. Back into the first sp, work 3 dc and then ch 2 to finish corner. Sl st to join top ch of first dc. (6 sides all together with 18 dc across each side)
Round 7:
Colour change to Yarn C, ch 3 (counts as first dc). Working back into the corner sp, place 2 dc going over Yarn A + B. Work 3 dc into the next 5 sps. [(3 dc, ch 2, 3 dc) into next corner sp, 3 dc into next 5 sps between the corners] 5 times. Back into the first sp, work 3 dc and then ch 2. Sl st to join top ch of first dc. (6 sides all together with 21 dc across each side)
Round 8:
Colour change to Yarn B, ch 3 (counts as first dc). Working back into the corner sp, place 2 dc going over Yarn A + C. Work 3 dc into the next 6 sps. [(3 dc, ch 2, 3 dc) into next corner sp, 3 dc into next 6 sps between the corners] 5 times. Back into the first sp, work 3 dc and then ch 2. Sl st to join top ch of first dc (6 sides all together with 24 dc across each side)
Round 9:
Colour change to Yarn C, ch 3 (counts as first dc). Working back into the corner sp, place 2 dc going over Yarn A + B. Work 3 dc into the next 7 sps. [(3 dc, ch 2, 3 dc) into next corner sp, 3 dc into next 7 sps between the corners] 5 times. Back into the first sp, work 3 dc and then ch 2. Sl st to join top ch of first dc (6 sides all together with 27 dc across each side)
Round 10:
Colour change to Yarn A, ch 3 (counts as first dc). Working back into the corner sp, place 2 dc going over Yarn B + C. Work 3 dc into the next 8 sps. [(3 dc, ch 2, 3 dc) into next corner sp, 3 dc into next 8 sps between the corners] 5 times. Back into the first sp, work 3 dc and then ch 2. Sl st to join top ch of first dc (6 sides all together with 30 dc across each side)
Round 11:
Ch 3 with Yarn A again (counts as first dc). Working back into the corner sp, place 2 dc going over Yarn B + C. Work 3 dc into the next 9 sps. [(3 dc, ch 2, 3 dc) into next corner sp, 3 dc into next 9 sps between the corners] 5 times. Back into the first sp, work 3 dc and then ch 2. Sl st to join top ch of first dc (6 sides all together with 33 dc across each side)
Round 12:
Colour change to Yarn B, ch 3 (counts as first dc). Working back into the corner sp, place 2 dc going over Yarn A + C. Work 3 dc into the next 10 sps. [(3 dc, ch 2, 3 dc) into next corner sp, 3 dc into next 10 sps between the corners] 5 times. Back into the first sp, work 3 dc and then ch 2. Sl st to join top ch of first dc (6 sides all together with 36 dc across each side)
Round 13:
Ch 3 with Yarn B again (counts as first dc). Working back into the corner sp, place 2 dc going over Yarn A + C. Work 3 dc into the next 11 sps. [(3 dc, ch 2, 3 dc) into next corner sp, 3 dc into next 11 sps between the corners] 5 times. Back into the first sp, work 3 dc and then ch 2. Sl st to join top ch of first dc. (6 sides all together with 39 dc across each side)
Round 14:
Colour change to Yarn A, ch 3 (counts as first dc). Working back into the corner sp, place 2 dc going over Yarn B + C. Work 3 dc into the next 12 sps. [(3 dc, ch 2, 3 dc) into next corner sp, 3 dc into next 12 sps between the corners] 5 times. Back into the first sp, work 3 dc and then ch 2. Sl st to join top ch of first dc. (6 sides all together with 42 dc across each side)
Round 15:
Change colour to Yarn C, ch 3 (counts as first dc). Working back into the corner sp, place 2 dc going over Yarn A + B. Work 3 dc into the next 13 sps. [(3 dc, ch 2, 3 dc) into next corner sp, 3 dc into next 13 sps between the corners] 5 times. Back into the first sp, work 3 dc and then ch 2. Sl st to join top ch of first dc. (6 sides all together with 45 dc across each side)
Notes:
- If only adding 3 granny squares to the backside of the cardigan for a smaller size – stop here after completing round 15 to then continue round 16 in Section 2: Sleeves.
- The dimensions of one of the sides on the hexagon for me at this point is approx. 14.5″ (measurement for half the hexagon starting from the middle to the edge is approx. 7.25″)
- You can optionally go to round 16 as well for 3 granny squares along the back and then continue to round 17 in next section (panel stitch count attached slightly different but still compatible).
Round 16:
Ch 3 with Yarn C again (counts as first dc). Working back into the corner sp, place 2 dc going over Yarn A + B. Work 3 dc into the next 14 sps. [(3 dc, ch 2, 3 dc) into next corner sp, 3 dc into next 14 sps between the corners] 5 times. Back into the first sp, work 3 dc and then ch 2. Sl st to join top ch of first dc. (6 sides all together with 48 dc across each side)
Round 17:
Colour change to Yarn A, ch 3 (counts as first dc). Working back into the corner sp, place 2 dc going over Yarn B + C. Work 3 dc into the next 15 sps. [(3 dc, ch 2, 3 dc) into next corner sp, 3 dc into next 15 sps between the corners] 5 times. Back into the first sp, work 3 dc and then ch 2. Sl st to join top ch of first dc. (6 sides all together with 51 dc across each side)
Round 18:
Colour change to Yarn B, ch 3 (counts as first dc). Working back into the corner sp, place 2 dc going over Yarn A + C. Work 3 dc into the next 16 sps. [(3 dc, ch 2, 3 dc) into next corner sp, 3 dc into next 16 sps between the corners] 5 times. Back into the first sp, work 3 dc and then ch 2. Sl st to join top ch of first dc. (6 sides all together with 54 dc across each side)
Round 19:
Colour change to Yarn A, ch 3 (counts as first dc). Working back into the corner sp, place 2 dc goingg over Yarn B + C. Work 3 dc into the next 17 sps. [(3 dc, ch 2, 3 dc) into next corner sp, 3 dc into next 17 sps between the corners] 5 times. Back into the first sp, work 3 dc and then ch 2. Sl st to join top ch of first dc. (6 sides all together with 57 dc across each side)
Round 20:
Ch 3 with Yarn A again (counts as first dc). Working back into the corner sp, place 2 dc going Yarn B + C. Work 3 dc into the next 18 sps. [(3 dc, ch 2, 3 dc) into next corner sp, 3 dc into next 18 sps between the corners] 5 times. Back into the first sp, work 3 dc and then ch 2. Sl st to join top ch of first dc. (6 sides all together with 60 dc across each side)
Round 21:
Colour change to Yarn C, ch 3 (counts as first dc). Working back into the corner sp, place 2 dc going over Yarn A + B. Work 3 dc into the next 19 sps. [(3 dc, ch 2, 3 dc) into next corner sp, 3 dc into next 19 sps between the corners] 5 times. Back into the first sp, work 3 dc and then ch 2. Sl st to join top ch of first dc. (6 sides all together with 63 dc across each side).
Notes:
- Round 22 will be the round where you will begin to start creating the sleeves (if using 4 granny squares along the back). You will only work along the first 4 sides, leaving the last 2 sides unfinished. At that point, you would then fold your hexagon to start connecting the sleeve and then build it from there onward. Start round 22 in Section 2: Sleeves.
- You can optionally go to round 22 as well for 4 granny squares along the back to then continue round 23 for next section (panel stitch count attached slightly different but still compatible).
- The dimensions of one of the sides on the hexagon for me at this point is approx. 20″ (measurement for half the hexagon starting from the middle to the edge is approx 10″)
If adding a 5th granny square along the back, make 6 more rounds for 27 rounds to then continue round 28 in Section 2: Sleeves. As per the other size options, you can optionally make up until round 28 and then continue round 29 in the next section (panel stitch count attached slightly different but still compatible). Change colours for the additional rounds to your preference. The dimensions of one of the sides on the hexagon will be approx. 25″ (measurement for half the hexagon starting from the middle to the edge is approx 12.5″)
Section 2: Sleeves
For this next section, we will work on building the sleeve for your crochet hexagon cardigan starting from where you left off in the last section. Starting round 16 (or 17) if using 3 granny squares along the back, starting round 22 (or 23) if using 4 granny squares, and starting round 28 (or 29) if using 5 granny squares. As per this demonstration, I will be continuing with round 22. It will be basically be the same process (only difference is the amount of sps between each corner and ending st counts on each side).
For this final round before building the sleeves, you will only make the first 4 sides of the round and leave the last 2 sides unfinished. The 2nd last side will be seemed to join with the first side up until the starting point. Then that last side will be where you would start adding length to your sleeve. See instructions below for more clarity.
Final Round for Hexagon (round 16, 22, 28):
- Colour change to Yarn B, ch 3 (counts as first dc).
- Working back into the corner sp, place 2 dc going Yarn A + C.
- Work 3 dc into the sps between the corners. [(3 dc, ch 2, 3 dc) into next corner sp, 3 dc into each sp between the corners] 3 times. (48, 66, 84 dc on each side)
- Work first 3 dc into corner sp, ch 1 to start corner. You should have 4 sides completed with 2 sides left over.
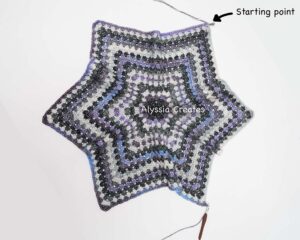
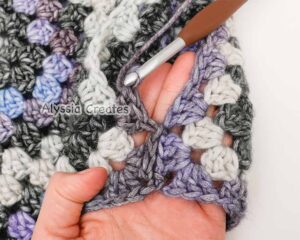
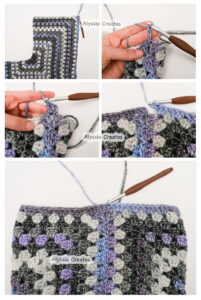
Seaming arm together:
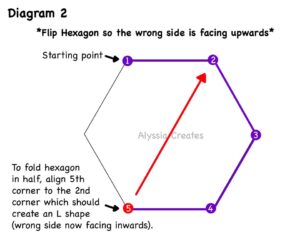
- Flip hexagon cardigan so that the wrong side is facing upwards.
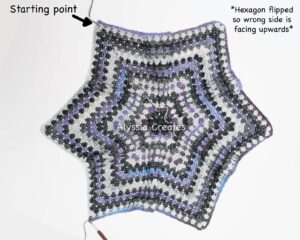
- From the corner that you are currently at (5th corner), fold the hexagon in half to meet the 2nd corner of the round. You should have created an upside down L shape (wrong side now facing inwards).
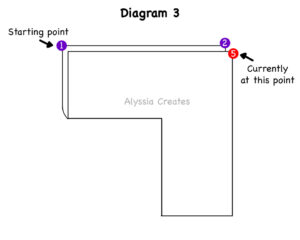

- With your hexagon folded in the upside down L shape, you are now going to continue round to complete 5th side while attaching to the 1st side as you go (seaming shoulder). See next step to do so.
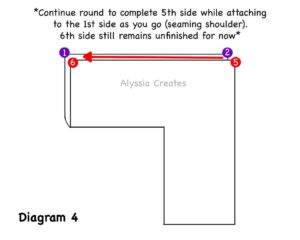
- To start to join shoulder seam, sl st into that 2nd corner sp. Ch 1, work 3 dc back into 5th corner sp to finish corner to continue side 5.
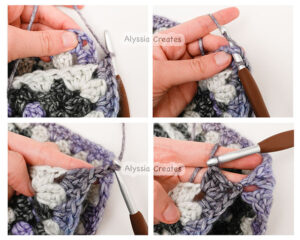
- *Sl st to join next sp on side 1, work 3 dc into next sp on side 5. Rep from * until you have reached the end of side 5.
- Sl st to join the top of first st from the beginning of round to join. Do not FO.
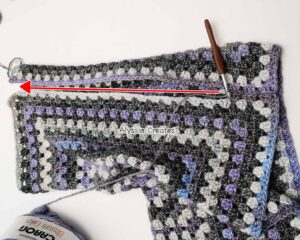
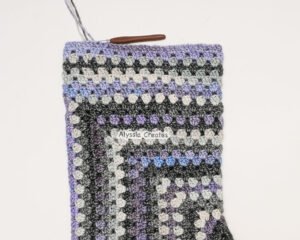
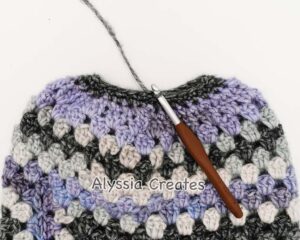
Sleeve:
We will now begin adding length to your sleeve. The first round will be finishing that 6th side. You can make the sleeve as long as you want – it may be helpful to put it on your arm as you go to see where a good length would be for you. I am going to do 8 rounds for the size with the 4 granny squares along the middle (this may be too long if you added addition rounds for additional granny squares along the back). The cuff will add an additional 2.5″.
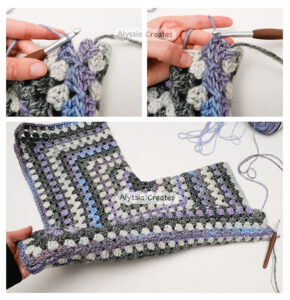
Round 1:
- From where you left off, ch 3 with Yarn B (first dc). Work 2 dc into the sp of the joined seam going over Yarn A + C to still carry those colours as you compete each round.
- Work 3 dc into each sp going around the opening of the sleeve (17, 23, 29 groups of 3 dc for 51, 69, 87 dc around – bolded numbers is the demonstrated version)
- Sl st to join top ch of first dc of round.
Round 2:
- Ch 3 with Yarn B still (first dc). Work 2 dc back into sp going over Yarn A + C.
- Work 3 dc into each sp going around the opening of the sleeve.
- Sl st to join top ch of first dc of round.
Round 3:
- Colour change to yarn C, ch 3 (first dc). Work 2 dc back into sp going over Yarn A + B.
- Work 3 dc into each sp going around the opening of the sleeve.
- Sl st to join top ch of first dc of round.
Round 4:
- Ch 3 with Yarn C still (first dc). Work 2 dc back into sp going over Yarn A + B.
- Work 3 dc into each sp going around the opening of the sleeve.
- Sl st to join top ch of first dc of round.
Round 5:
- Colour change to yarn A, ch 3 (first dc). Work 2 dc back into sp going over Yarn B + C.
- Work 3 dc into each sp going around the opening of the sleeve.
- Sl st to join top ch of first dc of round.
Round 6:
- Colour change to Yarn C, ch 3 (first dc). Work 2 dc back into sp going over Yarn A + B.
- Work 3 dc into each sp going around the opening of the sleeve.
- Sl st to join top ch of first dc of round.
Round 7:
- Colour change to Yarn B, ch 3 (first dc). Work 2 dc back sp going over Yarn A + C.
- Work 3 dc into each sp going around the opening of the sleeve.
- Sl st to join top ch of first dc of round.
Round 8:
- Ch 3 with Yarn B still (first dc). Work 2 dc back into sp going over Yarn A + C.
- Work 3 dc into each sp going around the opening of the sleeve.
- Sl st to join top ch of first dc of round.
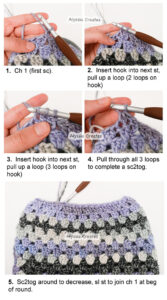
Note: for the demonstrated version of the sleeve, I will be stopping with round 8 for the length to now start the decrease rounds + cuff ribbing. Measure against yourself to determine the length that you would like for the sleeves. The ribbing will add about an additional 2.5″. The decrease rounds can be adjusted to the width that you would like your cuff to be; refer to the below instructions as a guideline. I recommended to try the sleeve on over your wrist with each decrease round to get any idea of a size you would like.
Decrease Round 1 (all sizes):
Ch 1 with Yarn B still (first sc – you can place st marker in this ch 1 to easier mark beginning of round). Sc2tog around to decrease, sl st to join ch 1 at beg of round (26, 35, 44).
Decrease Round 2:
Small Size (3 granny squares along the back): Colour change to Yarn A, ch 1 (first sc – you can place st marker in this ch 1 to easier mark beginning of round). Sc 10, sc2tog. Sc 11, sc2tog to decrease, sl st to join ch 1 at beg of round (24)
Medium Size (4 granny squares along the back): Colour change to Yarn A, ch 1 (first sc – you can place st marker in this ch 1 to easier mark beginning of round). Sc 4, sc2tog. [Sc 5, sc2tog to decrease] 4 times, sl st to join ch 1 at beg of round (30)
Large Size (5 granny squares along the back): Colour change to Yarn A, ch 1 (first sc – you can place st marker in this ch 1 to easier mark beginning of round). Sc 8, sc2tog. [Sc 9, sc2tog to decrease] 3 times, sl st to join ch 1 at beg of round (40).
FO Yarn B + C.

Decrease Round 3:
Small Size (3 granny squares along the back): Ch 1 (first sc – you can place st marker in this ch 1 to easier mark beginning of round). Sc 9, sc2tog. Sc 10, sc2tog to decrease. sl st to join ch 1 at beg of round (22)
Medium Size (4 granny squares along the back): Ch 1 (first sc – you can place st marker in this ch 1 to easier mark beginning of round). Sc 2, sc2tog. [Sc 3, sc2tog to decrease] 5 times, sl st to join ch 1 at beg of round (24)
Large Size (5 granny squares along the back): Ch 1 (first sc – you can place st marker in this ch 1 to easier mark beginning of round). Sc, sc2tog. [Sc 2, sc2tog to decrease] 9 times, sl st to join ch 1 at beg of round (30)
Decrease Round 4 (Optional):
Large Size Only (5 granny squares along the back) : Ch 1 (first sc – you can place st marker in this ch 1 to easier mark beginning of round). Sc 12, sc2tog. Sc 13, sc2tog to decrease, sl st to join ch 1 at beg of round (28)
Note: The following rounds will create the ribbing for the cuff of your sleeve. If you need the cuff to be more slim fitting (and don’t want to further decrease), you can size down your hook while creating the cuff rounds. I personally kept the hook size the same.
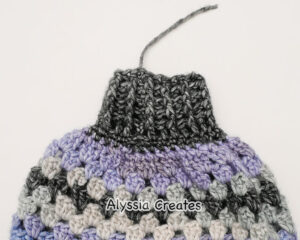
Cuff Round 1:
Ch 3 (counts as first dc). Work a dc into each st around, sl st to join top ch of first st. (22, 24, 28).

Note: The cuff will be achieved by alternating between front and back post dc sts.
Cuff Round 2 – 5 (or to desired length):
- Ch 3 (this will act as the first bpdc). * Fpdc, bpdc. Rep from * around. Round should end with a fpdc. Sl st to join top ch of first st. (22, 24, 28).
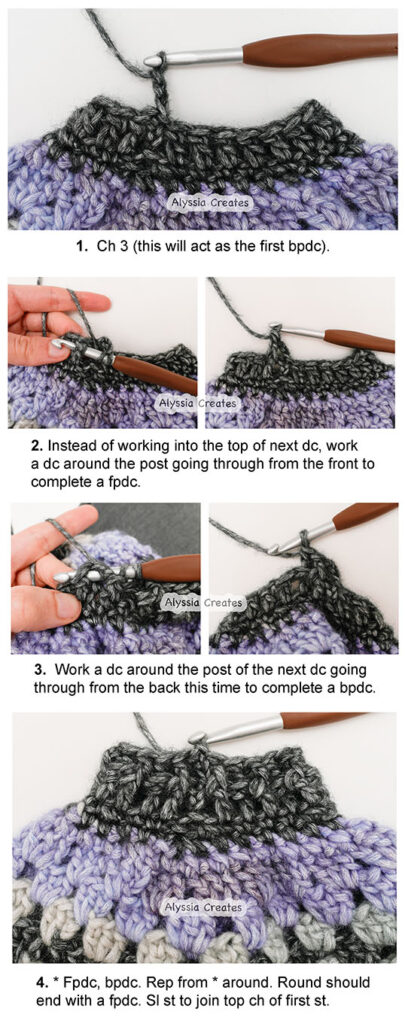
- FO once you have completed the desired length for you cuff.
Repeat entire process to make the 2nd side of your cardigan!
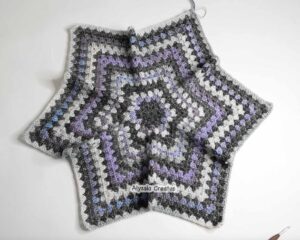
Section 3: Attaching the Backside Granny Squares into Panel
In this section, we will be working on attaching the granny squares together into a panel to place in between the two halves of your crochet hexagon cardigan. I will be demonstrating how to attach using the slip stitch join, however feel free to attach using any method that you would like!
Notes:
- Make sure your tension isn’t too tight for the sl st join. You may need to use a looser tension or even size up your hook to ensure the squares lay nicely 🙂
- Make sure to always work from front to back while attaching. Working yarn should remain underneath the join.
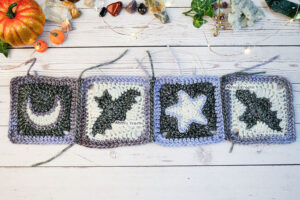
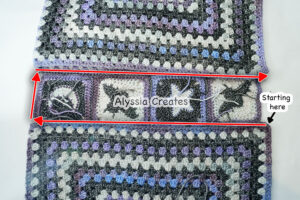
Start by laying your squares out as shown below. If your granny squares have a specific orientation, pay attention to the direction you are putting them to ensure they sit upright once assembled into your cardigan.
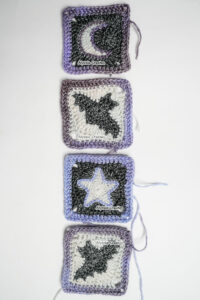
- Rotate squares as a group so that they are positioned in a horizontal line to make it easier to attach. You will seam the squares together as pictured below.

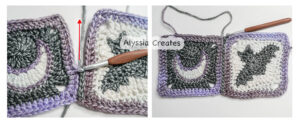
- With the squares laid out, start at either end to begin attaching the first set of squares next to each other. In the corners that align next to each other, insert hook into blo of the 2nd ch of both squares. Pull up a loop of Yarn A.
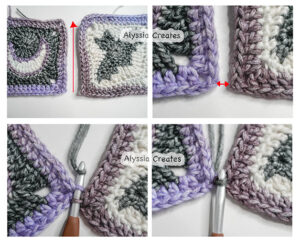
- Cont to sl st into each corresponding st until first ch of both top corners have been joined. FO.
- Rep until all granny squares in panel have been attached.
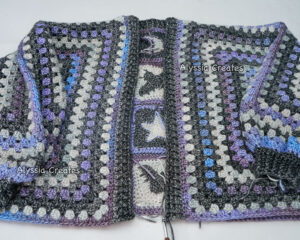
Section 4: Attaching Cardigan Together
In this section, we will assemble all 3 pieces together for your cardigan! We will again be using the slip stitch join for this process. The same notes apply for the slip stitch join (consistent tension that isn’t too tight, working yarn remaining underneath join etc.)
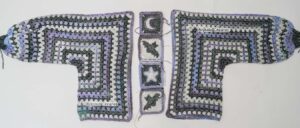
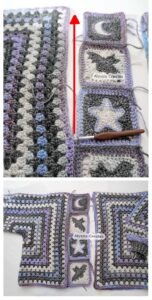
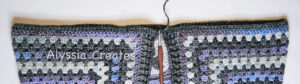
Place the flat sides of your two cardigan halves next to each other with the sleeves facing outwards. Both halves are the exact same, so it doesn’t matter which goes on which side, it’s just a matter of flipping around. Decide which side you want to be the back and then place the granny square panel that you attached in the previous section in the middle of the two halves.
Note: If you used granny squares with a different stitch count than I did for this demonstration (to reiterate, I used a stitch count of 15 + 2 for the corner chs for a total of 17 sts across the sides of each square), the following instructions to attach the granny square panel to the sides of your cardigan to have a compatible stitch count may need to be adjusted to suit the stitch counts that you have.
Small Size (3 granny squares along back):
If you started your sleeve while completing round 16 of the hexagon, this applies to you: The stitch count for the sides of the cardigan and the granny square panel will be 1 stitch off (1 additional stitch on the granny square panel). To fix this, skip 1 stitch on the panel somewhere along while attaching. With that said, each granny square of the panel will have 17 sts to attach into (1 ch for each corner + the 15 dc across the square. Do not attach into the seam between each square. In total, there will be 51 sts for the panel). The cardigan halves will have 50 sts to attach into (1 ch for the bottom corner + 1 ch for the top corner and then 48 sts in between).
If you started your sleeve while completing round 17 of the Hexagon, this applies to you: Each granny square of the panel will have 17 sts to attach into (1 ch for each corner of the square + the 15 dc across the square). There will also be the 2 seams between the squares on the panel to attach into. So in total with the 2 seams included, there will be 53 sts for the panel). The cardigan halves will also have 53 sts to attach into (1 ch for the bottom corner + 1 ch for the top corner and then 51 sts in between).
Medium Size (4 granny squares along back):
If you started your sleeve while completing round 22 of Hexagon, this applies to you: To ensure the panel of granny square sts align evenly with each side of the cardigan; each granny square of the panel will have 17 sts to attach into (1 ch for each corner + the 15 dc across the square. Do not attach into the seam between each square. In total, 68 sts along the side will be attached into). The cardigan halves will also have 68 sts to attach into (1 ch for the bottom corner + 1 ch for the top corner and then 66 sts in between)
If you started your sleeve while completing round 23 of Hexagon, this applies to you: To ensure the panel of granny square sts align evenly with each side of the cardigan; each granny square of the panel will have 17 sts to attach into (1 ch for each corner + the 15 dc across the square. There will also be the 3 seams between the squares on the panel to attach into. In total, 71 sts along the side will be attached into). The cardigan halves will also have 71 sts to attach into (1 ch for the bottom corner + 1 ch for the top corner and then 69 sts in between)
Large Size (5 granny squares along back):
If you started your sleeve while completing round 28 of Hexagon, this applies to you: The stitch count for the sides of the cardigan and the granny square panel will be 1 stitch off (1 additional stitch on the cardigan side). With that said, each granny square of the panel will have 17 sts to attach into (1 ch for each corner + the 15 dc across the square. Do not attach into the seam between each square. In total, 85 sts along the side will be attached into). The cardigan halves will have 86 sts to attach into (1 ch for the bottom corner + 1 ch for the top corner and then 84 sts in between). To offset the stitch count difference for that 1 stitch, you can add an additional st into the panel by working into 1 of the seams along that you would otherwise skip.
If you started your sleeve while completing round 29 of Hexagon, this applies to you: Each granny square of the panel will have 17 sts to attach into (1 ch for each corner of the square + the 15 dc across the square). There will also be the 4 seams between the squares on the panel to attach into. So in total with the 4 seams included, there will be 89 sts for the panel). The cardigan halves will also have 89 sts to attach into (1 ch for the bottom corner + 1 ch for the top corner and then 87 sts in between).
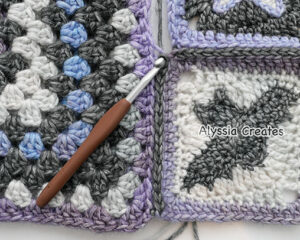
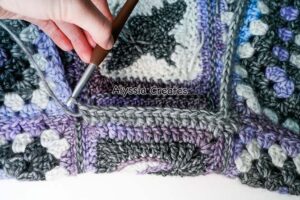
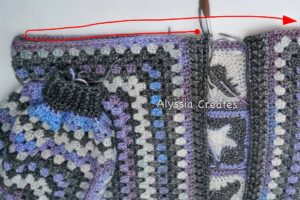
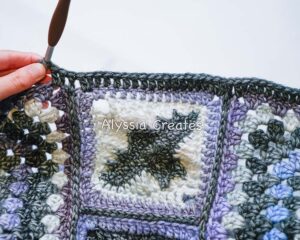
- You will seam the panel to the backside of each halve of the cardigan using the sl st join starting from the bottom working upwards as pictured below.
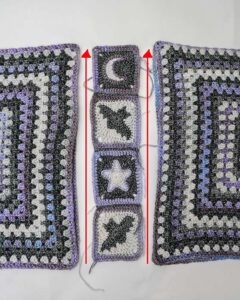
- Starting with either side, insert hook into blo of the 2nd ch of both the cardigan halve and the granny square at the bottom.
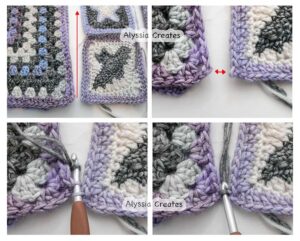
- Sl st into each corresponding st until the first ch of the corner of the granny square panel has been joined.
- If your sleeve started while completing round 16, 22 or 28 of hexagon: sk over the seam of the attached granny squares within the panel to then start joining into the next granny square (again starting in the 2nd ch of that corner) and attaching into the next st of the cardigan side.
- If your sleeve started while completing round 17, 23 or 29 of hexagon: Sl st to join into the seam of the panel with the next st of the cardigan side.
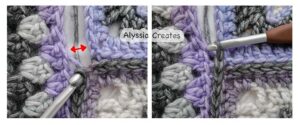
- Cont to sl st into each corresponding st as previously indicated until first ch of both top corners have been joined. FO.
- Repeat sl st join to piece together other side of cardigan.
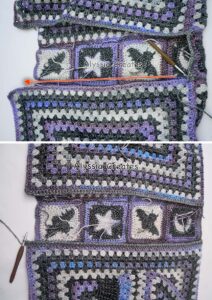
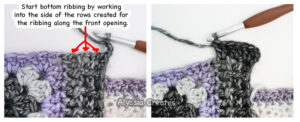
Section 5: Ribbing
To finish off, I like to add ribbing along the front opening around the neckline and also to the bottom of the cardigan. This is achieved through front post and back post dc stitches (like what you for the cuffs on your sleeves).
See instructions below:
Neckline Ribbing
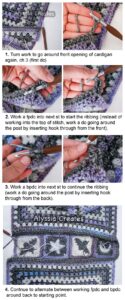
Row 1:
- With the front of the cardigan facing upwards, attach Yarn A into front bottom left corner (right corner if left handed). Ch 3 (counts as your first dc), work a 2nd dc into that corner sp.
- Dc into each st going up the side towards the top of your cardigan (stop after completing last st before corner).
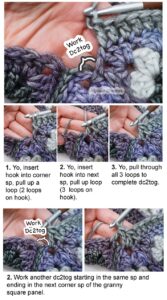
- Once you are at the corner sp at the top, dc the next 2 corners sps together to decrease (the corner sp of the front side of the cardigan with the corner sp of the backside of your cardigan). Work another dc2tog starting in the same sp and ending in the next corner sp of the backside granny square panel.
- Dc into next 15 sts across the granny square along the back.
- To mirror other side, dc2tog the granny square corner sp and next corner sp on the back of cardigan. Dc2tog back into same corner sp and into next corner sp in the front side of the cardigan.
- Dc along next side to the bottom of the cardigan. Work 2 dc into bottom corner to mirror other side.
Row 2:
- Turn work to go around front neckline of cardigan again, ch 3 (first bpdc). *Fpdc in next st, bpdc in next st. Rep from * around (once at top of neckline, make sure to work the dc2tog sts as one stitch and not accidentally work around the posts separately).
Row 3:
Note: Since you are turning work, you will have to alternate fpdc and bpdc opposite from how you did on the last row to ensure ribbing stays consistent.
- Turn work to go around front neckline of cardigan again, ch 3 (first dc). *bpdc in next st, fpdc in next st. Rep from * around. Do not FO.
Bottom Ribbing
From where you left off, you are now going to start working along the bottom of your cardigan (rotate so bottom of cardigan is at top so you can wok along that edge).
Row 1:
- Ch 3, then work 2 dc into the side sp from row 3. Work 2 dc into the side sp of row 2 and then work 2 dc into the side sp of row 1 (note: you can optionally work only 1 dc into these side row sps instead – it doesn’t really matter) .
- Work 2 more dc into corner sp. Dc into each st along the bottom until next corner sp. * Work 2 dc into corner sp, dc into seam, work 2 dc into next corner sp*. Dc 15 across bottom of granny square panel. Rep from *-* once.
- Continue to dc into each st across until next corner sp where you will again place 2 dc. To mirror other side, place 2 dc into the side of each row created for the front neckline ribbing.
Row 2:
- Turn work to go across bottom again. Ch 3 (first dc). *Fpdc in next st, bpdc in next st. Rep from * to other side.
Row 3:
- Turn work. Ch 3 (dc). *bpdc in next st, fpdc in next st. Rep from * to other side. FO.
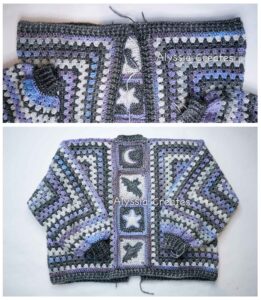
All Done!
I hope you enjoyed creating this cardigan – I would absolutely love to see the results! Please link to my website alyssiacreates.com and tag me @alyssia.creates on Instagram or Tiktok if you post your cardigan!
Like what you learned? Pin for later!
Hey, this is awesome! Is there a pattern available for the bat granny square?
Hi! Thanks so much! I don’t currently have a pattern for the bat granny square – but I have started the process of putting a pattern together for it 🙂
Could you please share the colors/brand you used for the mostly black cardigan with the moon and stars?
I used Caron Simply Soft for the black + grey and then Arcane Fibre Works for the variegated yarn 🙂 I don’t remember which colours unfortunately.