This post may contain affiliate links. Should you make a purchase through one of these links, I may earn a small commission that supports me to keep making new content at no additional cost to you. For more info, please visit the Privacy Policy page.
A magic circle allows you to quickly begin your first round by avoiding the need to create a foundation chain circle and it also allows for your circle to close more tightly. In this post, I will go over how to make the magic circle and also give examples of how to work a round of single crochet and double crochet into the circle.

Supply List:
Yarn that I am using:
Hook that I am using:
Some other useful tools:
- Tapestry needle (to weave in ends)
- stitch markers
- Scissors
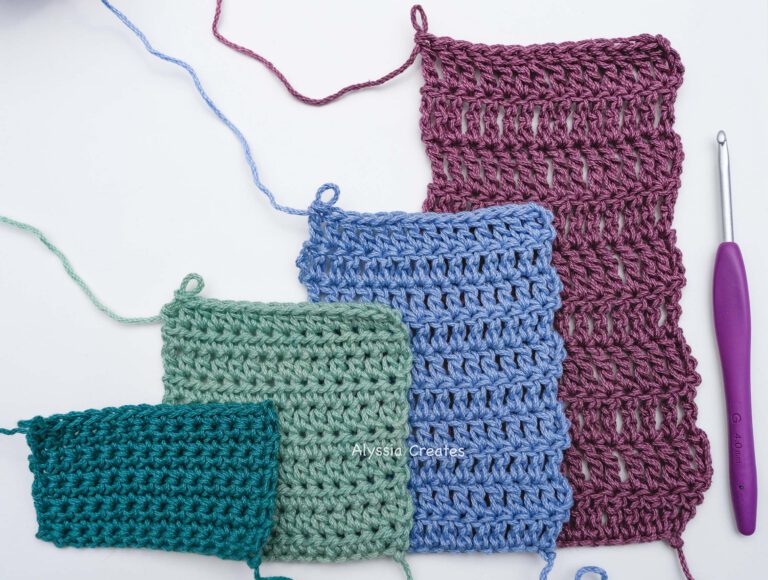
Stitches Used/Abbreviations (US Terms)
- ch = Chain
- st(s) = Stitch(es)
- sl st = Slip Stitch
- sc = Single Crochet
- dc = Double Crochet
- yo = Yarn over
- Working yarn = the strand that is still connected to the yarn ball/skein
- Yarn end/tail = the end of the yarn
Notes:
- This demonstration is from a right handed crochet perspective and uses US terms.
- Photo steps with breakdowns are included below text instructions for those who are more visual learners.
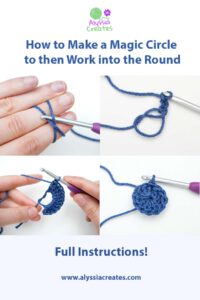
How to Make a Magic Circle
Starting Circle:
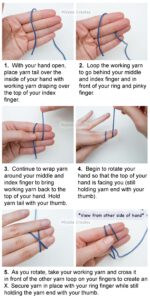
- With your hand open, place yarn tail over the inside of your hand with working yarn draping over the top of your index finger.
- Loop the working yarn to go behind your middle and index finger and in front of your ring and pinky finger.
- Continue to wrap yarn around your middle and index finger to bring working yarn back to the top of your hand. Hold yarn tail with your thumb.
- Begin to rotate your hand so that the top of your hand is facing you (still holding yarn end with your thumb)
- As you rotate, take your working yarn and cross it inwards to go in front of the other yarn loop on your fingers to create an X.
- When looking at the x, the working yarn end should be the yarn pointing inwards towards your hand. Secure yarn in place with your ring finger while still holding the yarn end with your thumb.
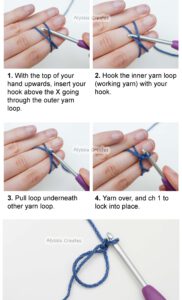
Completing circle:
- With the top of your hand upwards, insert your hook above the X going through the outer yarn loop.
- Then hook the inner yarn loop (working yarn) with your hook.
- Pull loop underneath other yarn loop.
- Yarn over, and chain 1 to lock into place.
Note: the amount of chains you make after creating the magic circle will depend on which stitch you are using to work into the round. For instance:
- Single crochet would be 1 chain
- Half double crochet would be 2 chains
- Double crochet would be 3 chains
- Triple crochet would be 4 chains
Depending on the pattern, these starting chains may or may not count as the first stitch of your round.
Working a Round into the Magic Circle
You would work into a magic circle the exact same way as you would with a circle made from a foundation chain.
For this demonstration, I’ll go through the process of working a round of single crochet and double crochet into your magic circle.
Working First Round of Single Crochet into a Magic Circle
When working with single crochet, I find if I make the ch 1 count as the first sc it can be difficult to slip stitch to join this ch 1 once I get to the end of the round. So with that said, when working with sc in the round, I don’t count the ch 1 as a stitch – I will rather slip stitch to join the actual first sc made.
It’s also worth noting that when working with rounds of sc, sometimes a round will be a continuous round – this means that there is not a slip stitch join at the end of each round. Once you complete each round, you would rather start working back into the first stitch of the round to start the next round and continue this way. Each round, you would place a stitch marker into the first stitch so you know where the round actually begins. This way there won’t be a joining seam.
For the sake of this demonstration, I will give 2 examples of working 6 sc into the magic circle; a regular round that would slip stitch to join and also a continuous round.
Regular round:
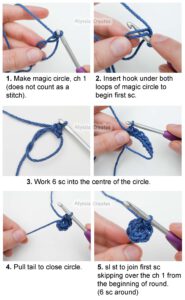
- Make magic circle, ch 1 (does not count as a stitch).
- Begin to work 6 sc into the centre of the circle making sure to work under both yarn strands.
- Pull tail to close circle.
- Sl st to join first sc skipping over the ch 1 from the beginning of round. (6 sc around)
Continuous round:
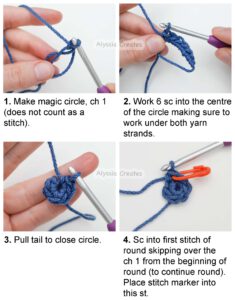
- Make magic circle, ch 1 (does not count as a stitch).
- Work 6 sc into the centre of the circle making sure to work under both yarn strands.
- Pull tail to close circle.
- Sc into first stitch of round skipping over the ch 1 from the beginning of round (to continue round). Place stitch marker into this st.
From here, you would continue as instructed in the pattern you are following. Perhaps that is by working increases in the stitches to keep your work flat – or maybe the pattern instructs differently so your work begins to dome.
Working First Round of Double Crochet into a Magic Circle
Unlike with my sc example, when working with dc into the circle, I will count the beginning chs as a stitch because they can easily be worked into when joining at the end of the round.
For the sake of this demonstration, I will give 1 example of working 12 double crochet into the magic circle.
Round 1:
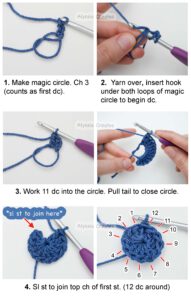
- Make magic circle. Ch 3 (counts as first dc)
- Work 11 dc into the circle making sure to work under both yarn strands.
- Pull tail to close circle.
- Sl st to join top ch of first st. (12 dc around)
From here, you would continue as instructed in the pattern you are following. Perhaps that is by working increases in the stitches to keep your work flat – or maybe the pattern instructs differently so your work begins to dome.
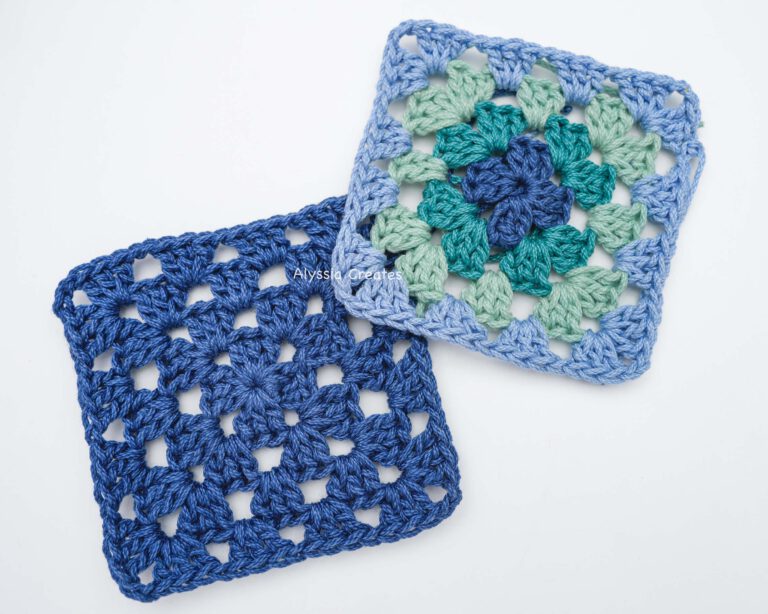
What’s next?
Continue to work in the round with how to crochet a traditional granny square or a solid granny square!
Like what you learned? Pin for later!